 进阶
进阶
# ES核心概念
1、索引:数据库,非常多文档的集合
2、字段类型:整型,浮点型,.....
3、文档:一条条的数据,Json格式
物理设计:
ES在后台将每一个索引划分为多个分片,每一个分片可以在集群中的不同服务器之间迁移。
如果没有集群配置,那么一个人就是一个集群,默认集群名字是elasticsearch
逻辑设计:
我们寻找文档,可以通过:索引-->类型-->文档ID来找到它
倒排索引
假设现在有两个文档:
Study every day, good good up to forever # 文档1包含的内容
To forever, study every day, good good up # 文档2包含的内容
现在将每一个词条抽出来,然后创建一个不重复的排序列表,这就是倒排索引
| term | doc_1 | doc_2 |
|---|---|---|
| Study | ✔ | x |
| To | ✖ | ✔ |
| every | ✔ | ✔ |
| forever | ✔ | ✔ |
| day | ✔ | ✔ |
| student | ✖ | ✔ |
| good | ✔ | ✔ |
| to | ✔ | ✖ |
| up | ✔ | ✔ |
那么我们现在想要根据倒排索引查询:to forever
| term | doc_1 | doc_2 |
|---|---|---|
| to | ✔ | ✖ |
| forever | ✔ | ✔ |
那么两个文档都能匹配到,但是doc_1匹配度(权重)更高,所以默认按照权重排序的话,doc_1在前面。
再看另外的实例:

假如我要查找python,不会到文档4去查找,因为倒排索引文档中根本就没有。
索引
当我们想要创建索引时:
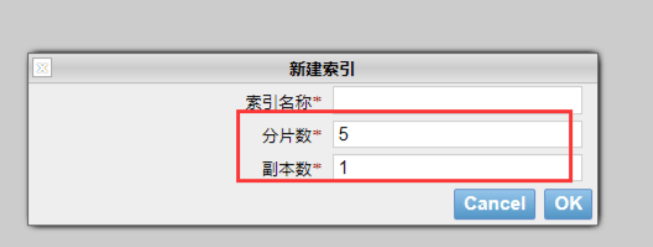
在刚才的物理设计中我们说过,一个索引有多个分片,每一个分片都可以在集群内中的不同服务器中进行转移。
现在引入另外一个概念:节点。
一个节点是一个ES进程,节点可以有多个节点。
默认的,如果你创建索引,那么索引将会有五个分片(如上图),这五个分片又称主分片。
每一个主分片都会有一个副本,副本又称复制分片。
但是主分片和复制分片不会在同一个节点内,这样做的原因是:
假如有一个节点挂掉了,数据也不会丢失。
事实上,一个分片是一个Luncene索引,包含倒排索引的文件目录

上图就是一个集群中的多节点。我们可以看到索引的主分片和复制分片不在同一个节点内。
# IK分词器插件
# 什么是IK分词器
分词器有很多种,ES内置的有很多,但是专为中文分词还真没有几个。
IK分词器,专为中文分词。
# 安装
- 下载:https://github.com/medcl/elasticsearch-analysis-ik (opens new window)
- 下载完成之后,放到ES插件中即可,会自动读取

- 重启观察ES,发现被加载了

# 使用
IK分词器有两种使用方式:
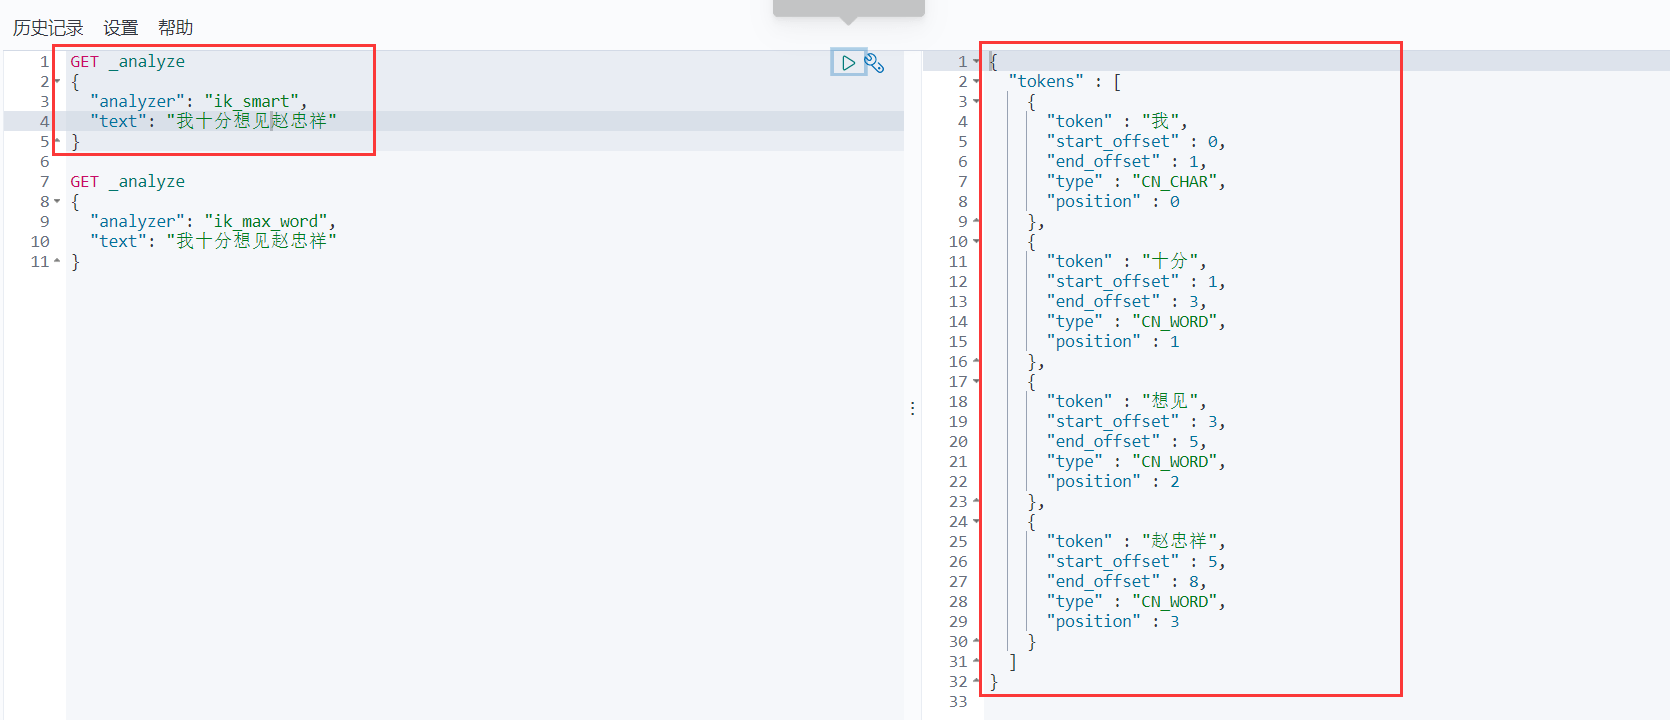
最小切分
最细粒度划分
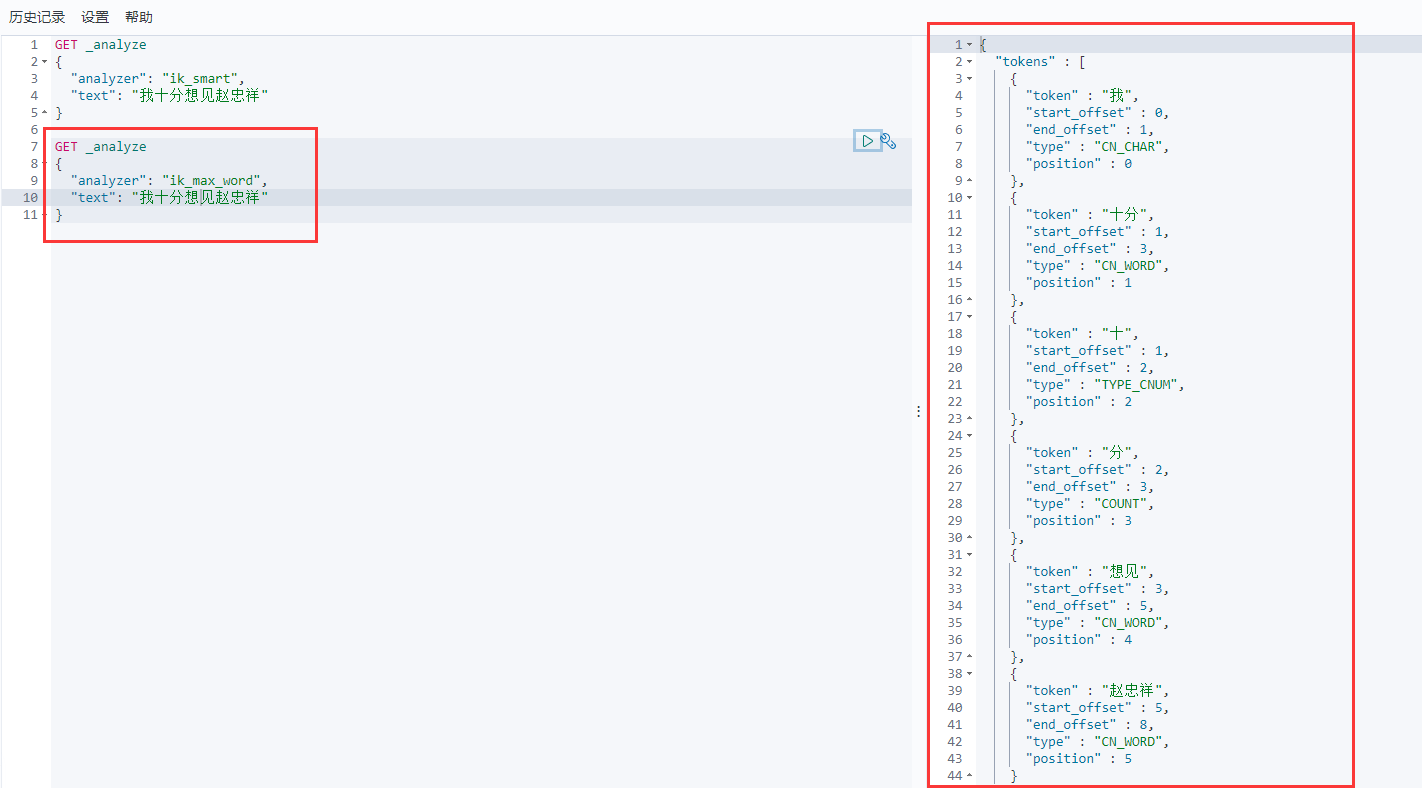
这么一看可能还不太清楚,那就说清楚点:
- 最小切分:按照一个词一个词地拆分,拆成最小的词语。
- 最细粒度划分:不管是词还是字,只要在字典里的,那就拆。
# 配置字典
经过上面的基本使用,那么问题来了:词典在哪呢?
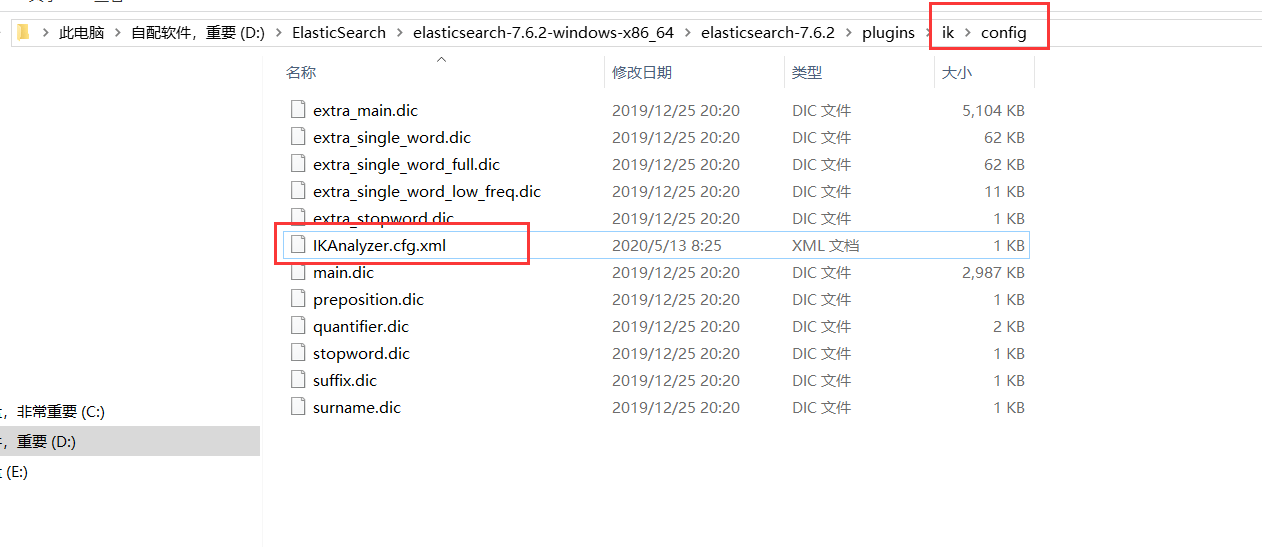
这就是词典的路径,如果要添加词典,那么就要打开这个文件,添加自己的词典
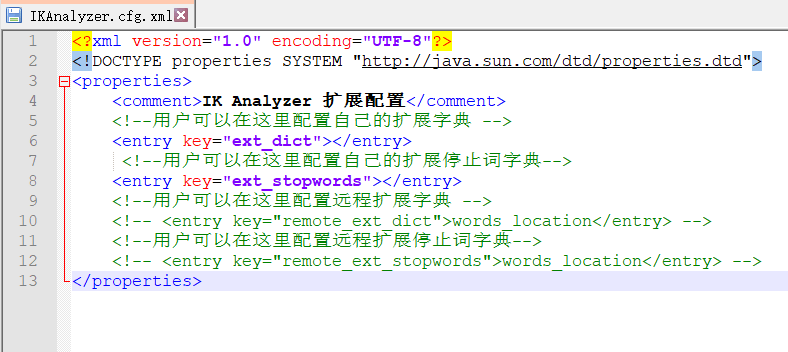
举个例子,我输入howling牛逼,但是并没有这个词
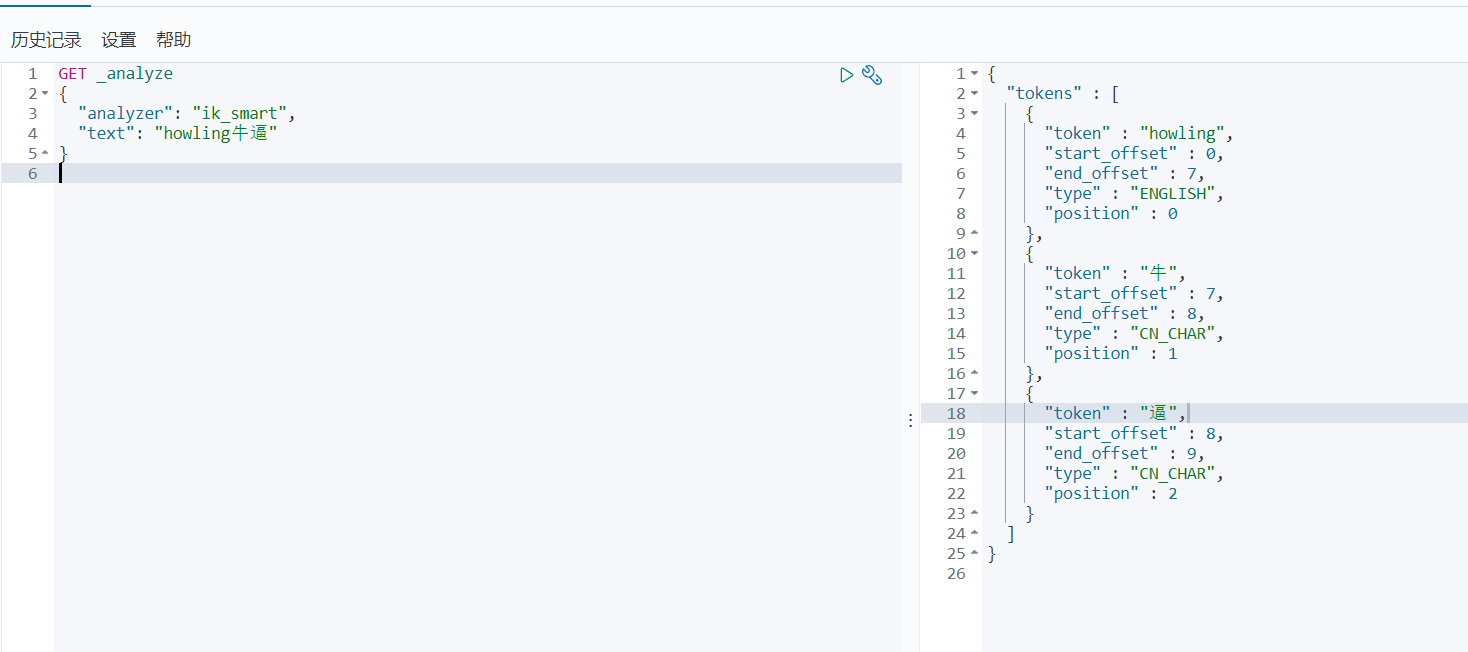
下面我自己定义一个词典,然后重新启动ES
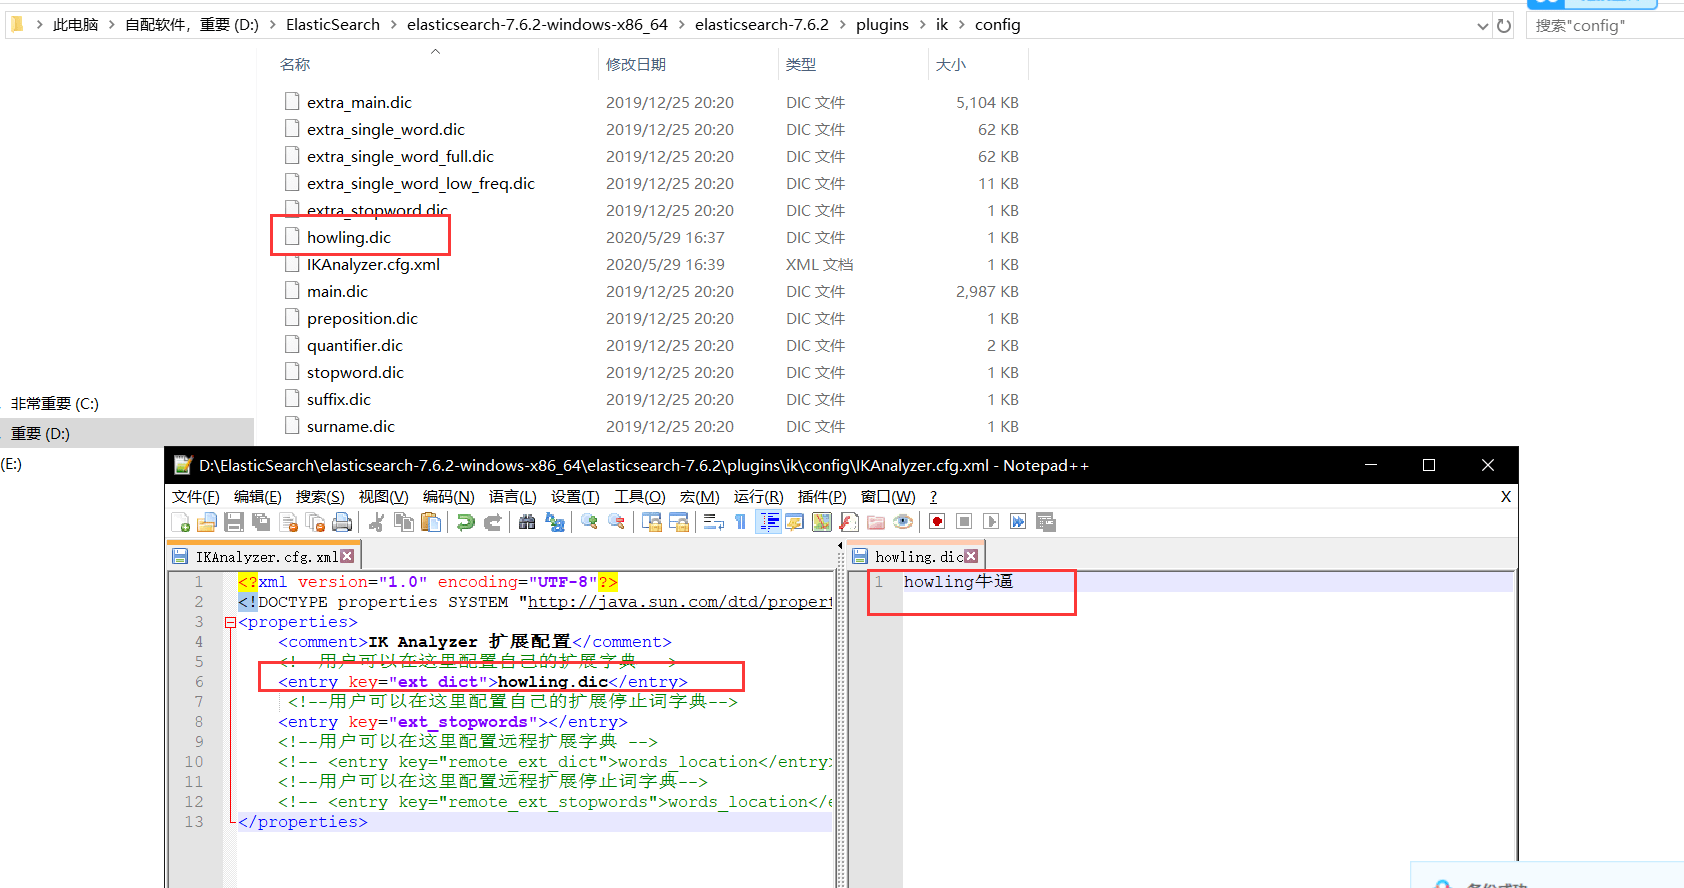
在启动的过程中,发现IK分词器插入了一个自己配置的字典:

下面再次请求

有了
# ES的Rest请求说明
| method | 例子 | 描述 |
|---|---|---|
| PUT | 索引名字/类型名字/文档id | 创建文档(指定id) |
| POST | 索引名字/类型名字 | 创建文档(随机指定id) |
| POST | 索引名字/类型名字/文档id/_update | 修改文档 |
| DELETE | 索引名字/类型名字/文档id | 删除文档 |
| GET | 索引名字/类型名字/文档id | 通过文档id查询文档 |
| POST | 索引名字/类型名字/_search | 查询所有数据 |
注意,REST全部都要大写
# PUT
PUT创建
PUT /test2/_doc/1
{
  "name": "howling",
  "age": 3
}

看这里,警告说不推荐使用类型,这是因为类型在以后的ES中将会废弃,以后的默认类型就是
_doc,我们听官方的
# POST
POST创建
POST /test1/_doc
{
  "name": "howling",
  "age": 3
}

POST修改
POST /test1/_doc/wl6mX3IBMWmBNnUPxx_8/_update
{
  "doc": {
    "name": "bean",
    "age": 113
  }
}

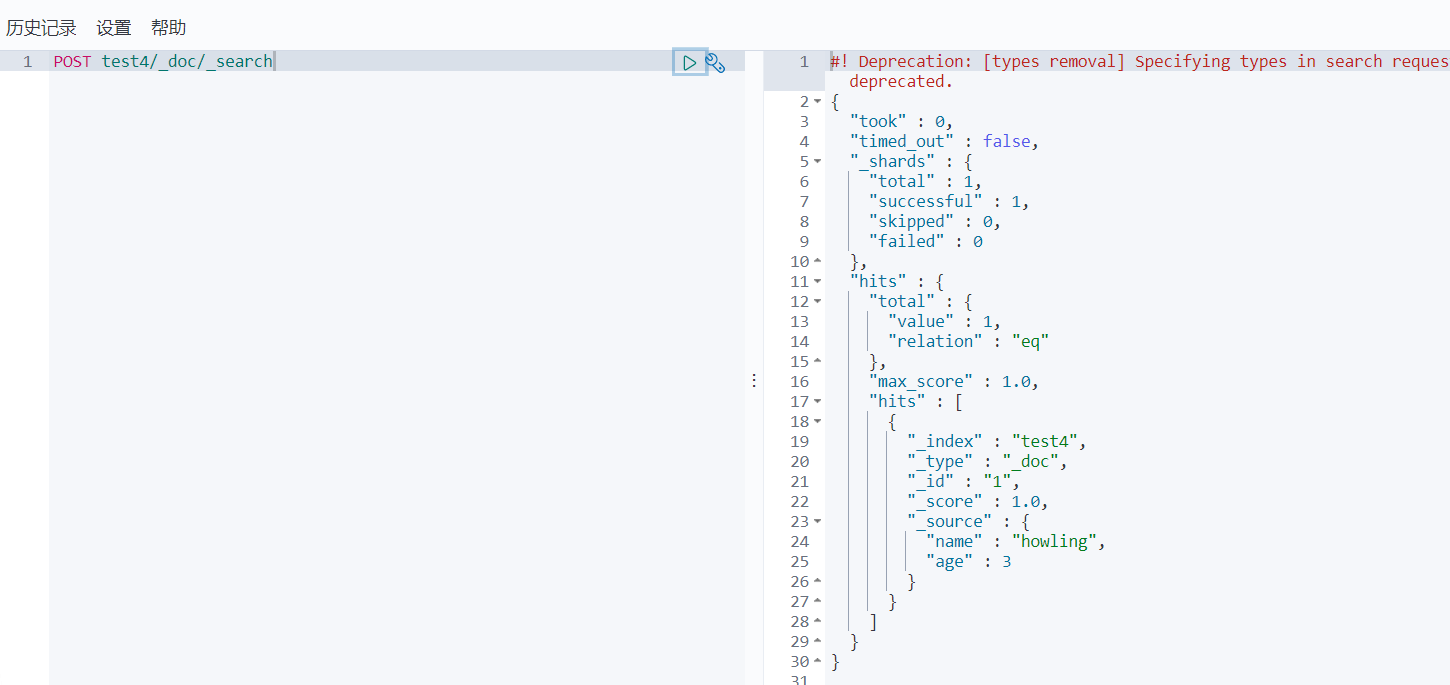
POST查询
POST test4/_doc/_search
# DELETE
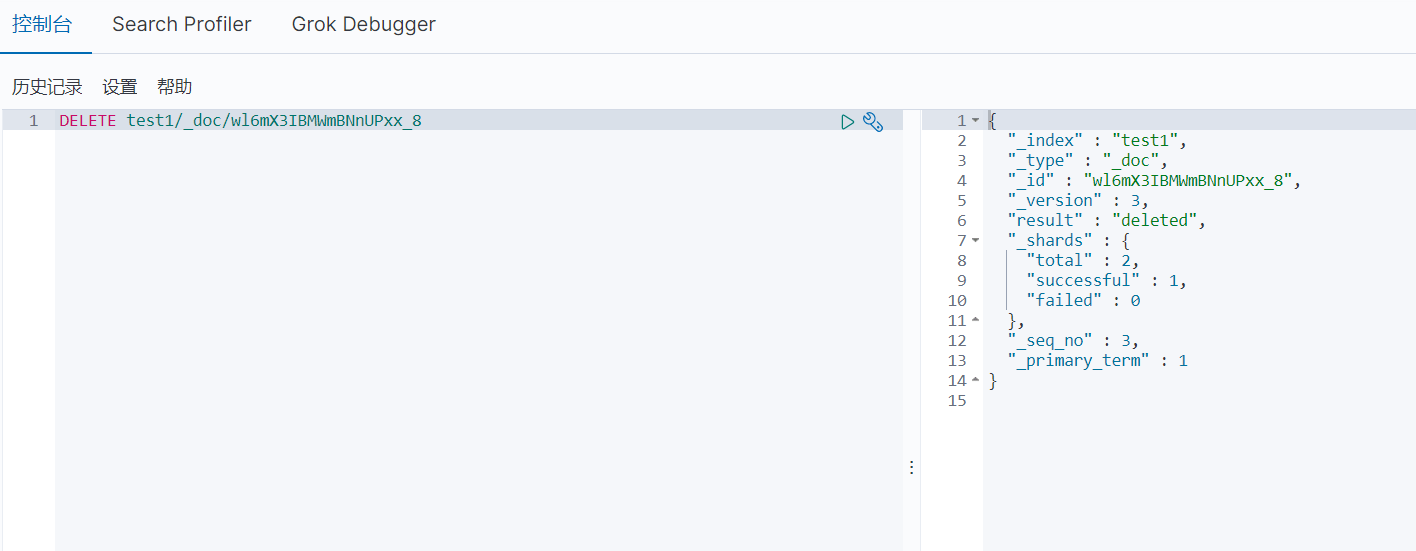
DELETE删除文档
DELETE test1/_doc/wl6mX3IBMWmBNnUPxx_8
# GET
GET获取文档
GET /test4/_doc/1

# 修改使用POST和PUT的比较
未修改之前:

原来的方法就是使用PUT来修改
PUT test4/_doc/1
{
  "name": "bean"
}

age给改没了
现在的方法是使用POST来修改
复原数据,再来一次
POST test4/_doc/1/_update
{
  "doc": {
    "name": "bean"
  }
}

发现
age没有变
所以现在我们通常使用POST来进行修改,虽然写法上有些复杂,但是数据不会丢失
# ES创建索引规则
在上面,索引规则是自动添加的,可以截个图看一下:

从这张图可以看出来,在我们没有指定索引的情况下,ES可以根据我们输入的数据自动推算
索引类型
- 字符串:text,keyword
- 数值:byte,short,integer,long,double,float,half_float,scaled_float
- 日期:date
- 布尔:boolean
- 二进制:binary
- 等
其中有一些类型的区别我们需要探讨一下,后面会讲到
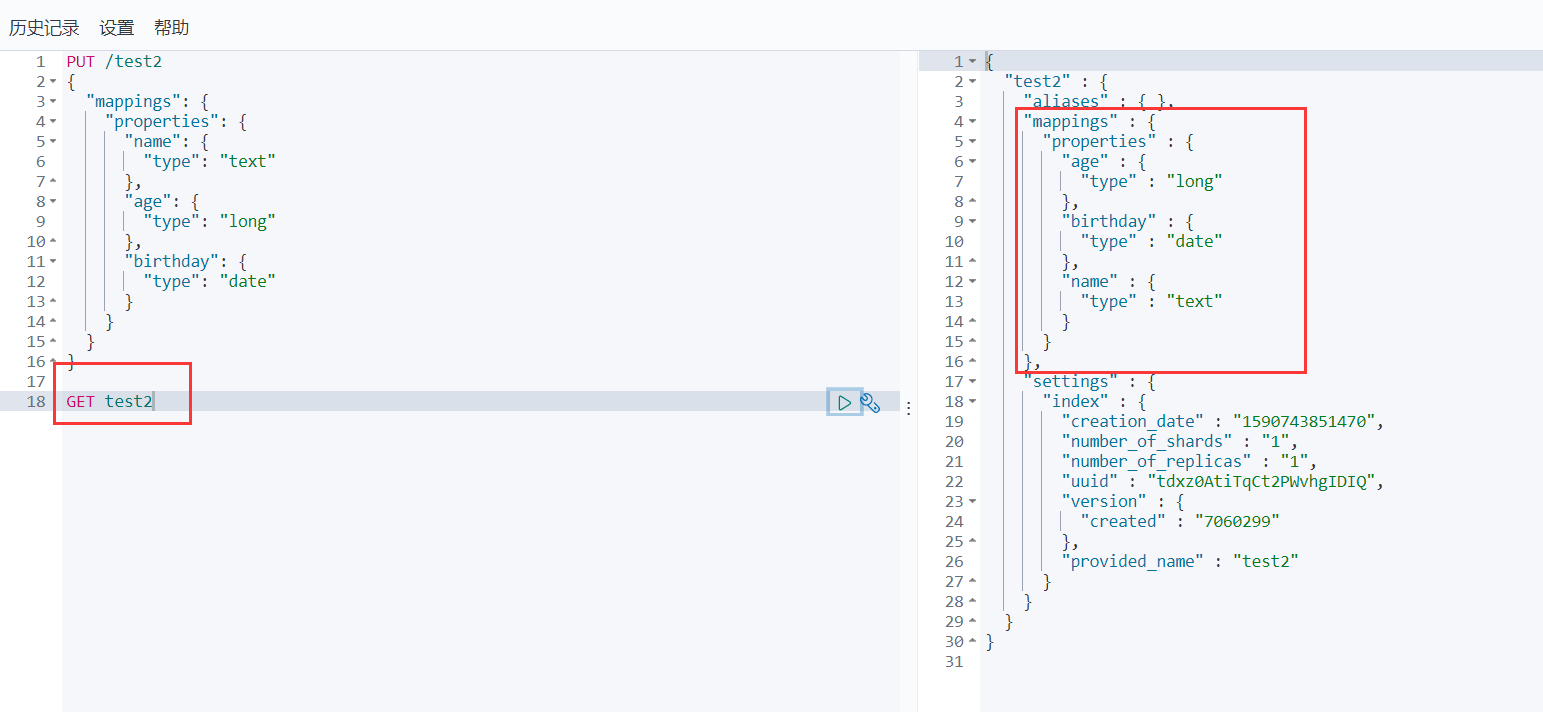
我们也可以手动指定索引类型
我们可以看到,在上面的图中,有一个mappings,指定了类型,这里也是mappings
PUT /test2
{
  "mappings": {
    "properties": {
      "name": {
        "type": "text"
      },
      "age": {
        "type": "long"
      },
      "birthday": {
        "type": "date"
      }
    }
  }
}
注意,我只是指定到了索引的类型,而没有指定到类型或者是某一个文档
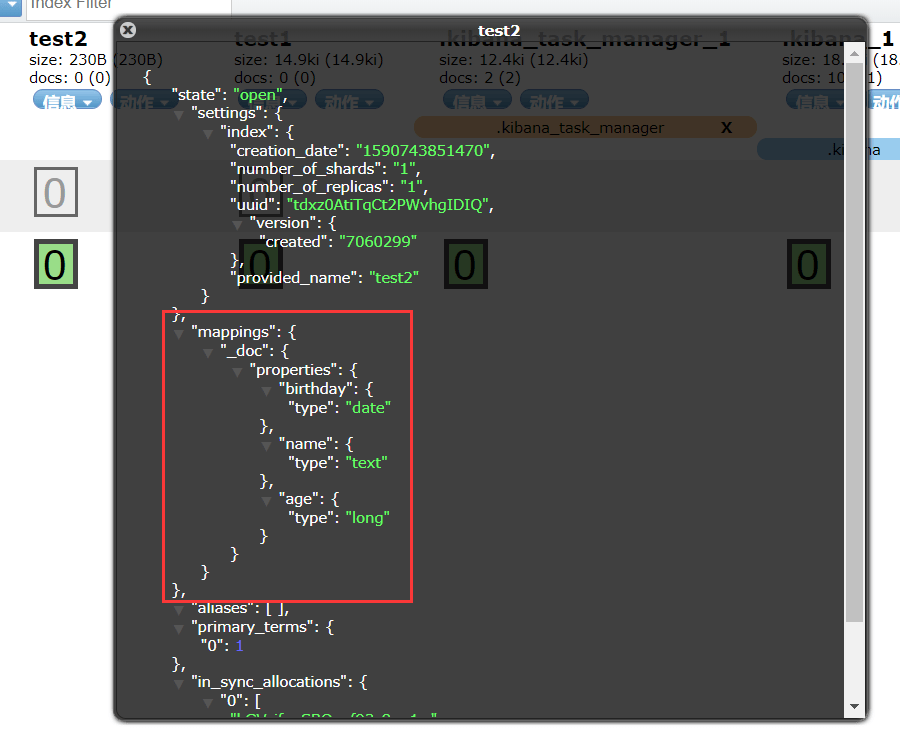
可以通过GET命令查看
# 复杂搜索
# 前言
我们之前在REST请求的时候曾经有过搜索,根据ID的最简单搜索,但是我们当然不限于此
我们知道,其实大部分时间都在和查询打交道,所以查询是重点。
接下来请看查询的骚操作
- 排序查询
- 分页查询
- 高亮查询
- 模糊查询
- 精准查询
- 多条件查询
- 多参数匹配查询
# 查询
# term和match,keyword和text的分析对比
在开始之前,我先在文档里面放入四个数据:

下面使用这四条数据来进行两组的说明
# term和match
- term:用于精确匹配
- match:用于分词匹配
这样说可能有点不太好理解,那就用通俗点的说:
term只能查一个词,match能查多个词。
(注意,term查一个词的意思不是说只能查询出一个词,而是在文档中包含这个词的才可以查询出来,但是一次只能查询一个关键词)
原因在于:term是直接进行倒排索引的方式查询的,而match是通过分词的方式查询的
倒排索引的方式一下只能查询一个词语。
分词查询是先分词,然后在查询
理论很清晰了,下面来看例子
term
GET /test1/_search
{
  "query": {
    "term": {
      "name": "howling"
    }
  }
}
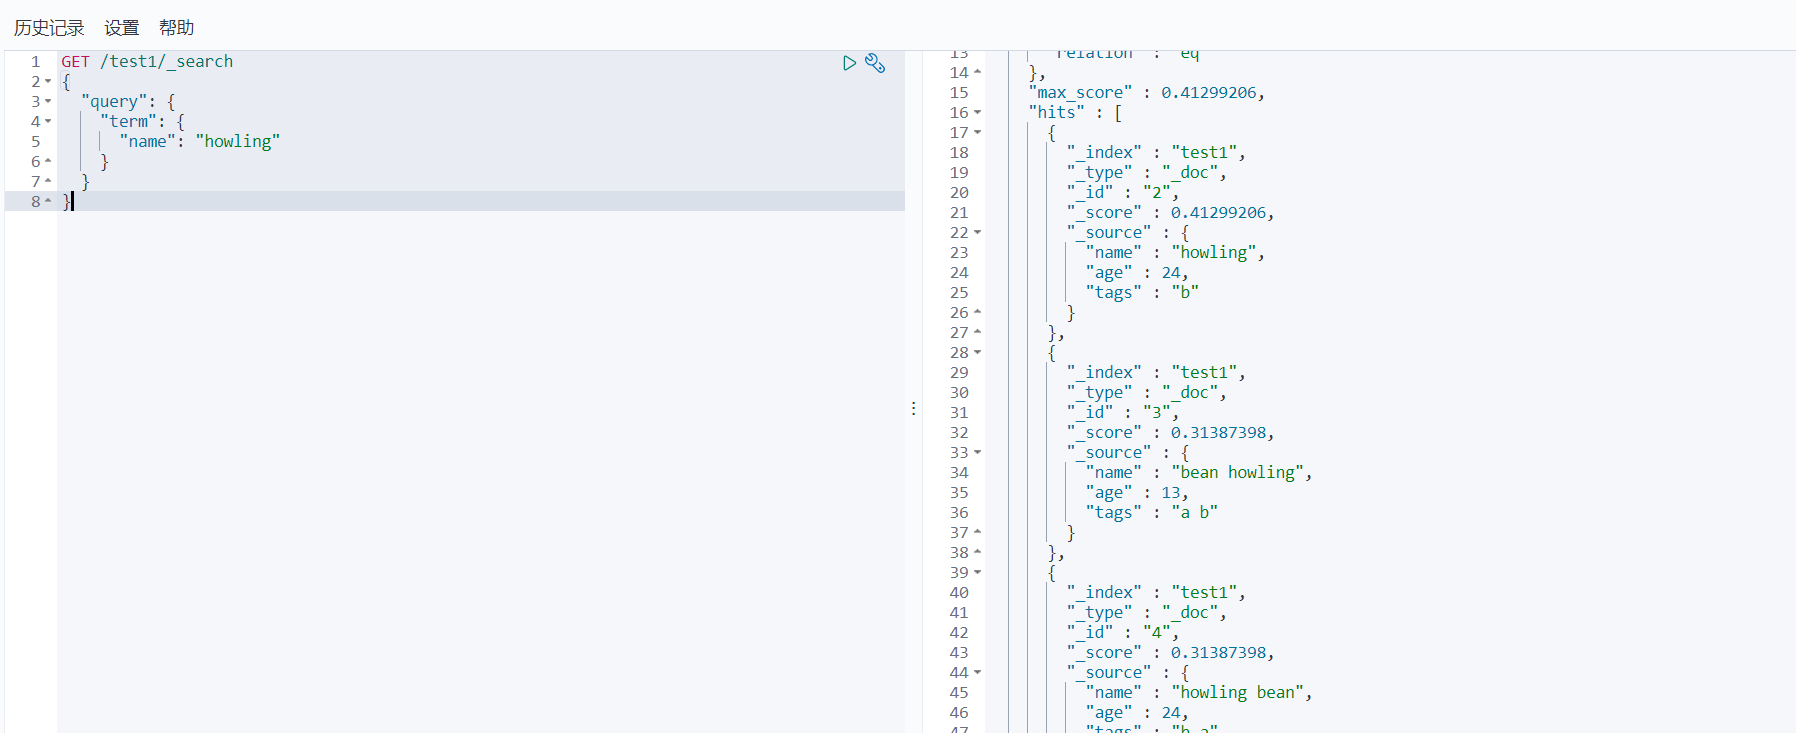
查询单个词还不错
GET /test1/_search
{
  "query": {
    "term": {
      "name": "howling bean"
    }
  }
}
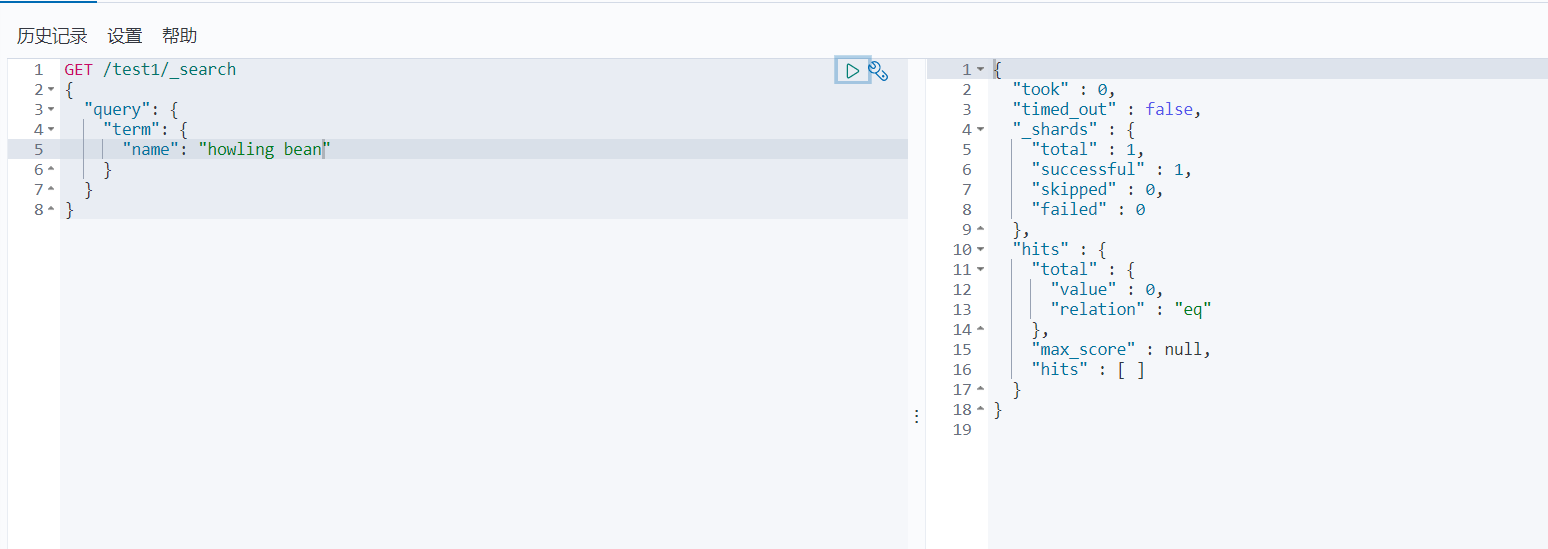
查多个词查不到,原因已经讲过了,倒排索引一次只能查询一个
match
GET /test1/_search
{
  "query": {
    "match": {
      "name": "howling bean"
    }
  }
}
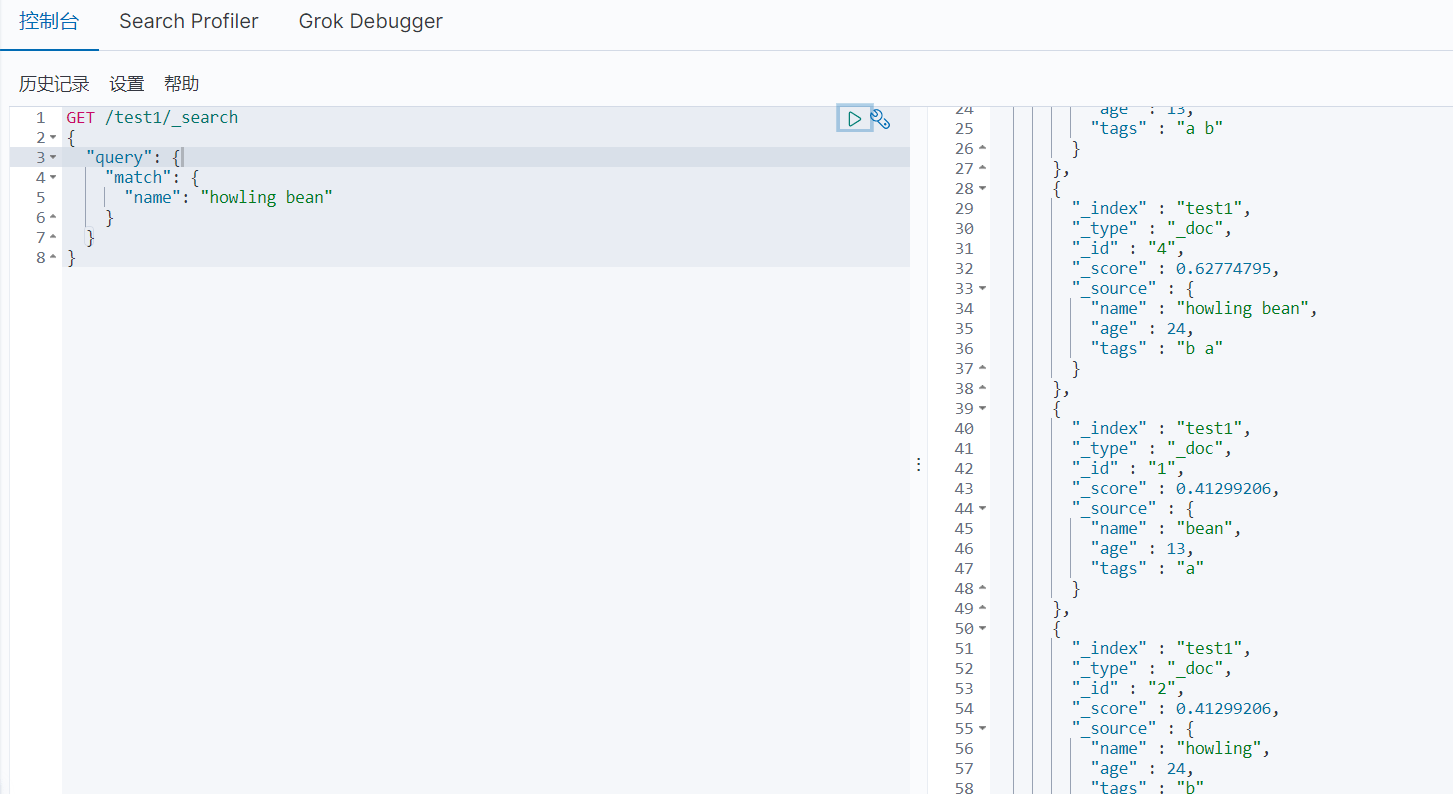
四个都查出来了
GET /test1/_search
{
  "query": {
    "match": {
      "name": "howling"
    }
  }
}
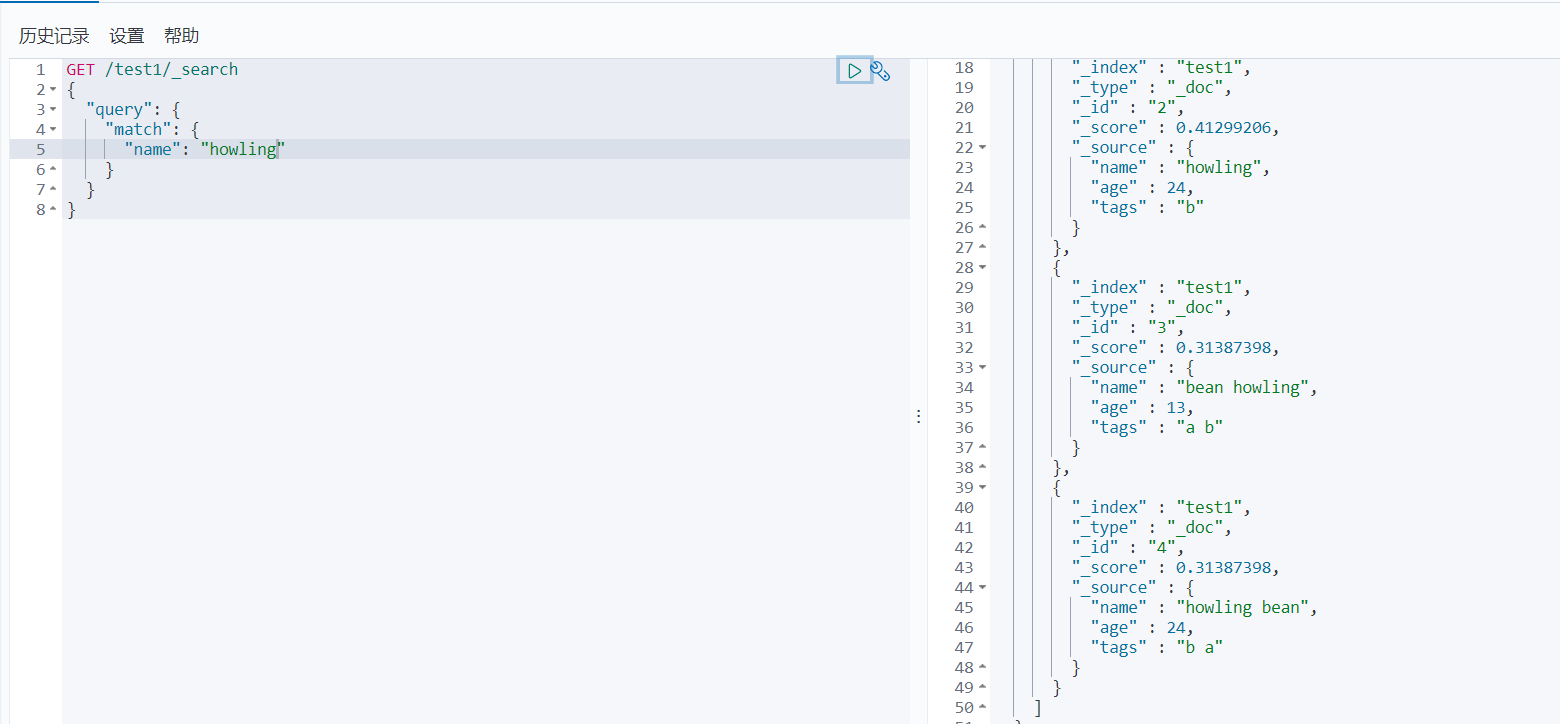
查询单个更是不在话下
# keyword和text
- keyword:不能被拆分
- text:可以被拆分
这么说吧,keyword可以被分词器拆分,而text不可以被分词器拆分
在细致点:
- keyword可以看成是一个字
- 而text可以看成是一句话
所以keyword不可以被拆分的意思是,只要有了keyword属性,那么这个属性就相当于一个字,一个字还想怎么被分词器解析呢?
text可以看成一句话,所以一句话可以被分词器解析的
那么就又印出来一个新的操作:
keyword既然可以被看成一个字,那么在term上就可以解析了,因为倒排索引显然可以查询一个字
下面来看一组对比:
term
GET /test1/_search
{
  "query": {
    "term": {
      "tags": "a b"
    }
  }
}

match
GET /test1/_search
{
  "query": {
    "match": {
      "tags": "a b"
    }
  }
}
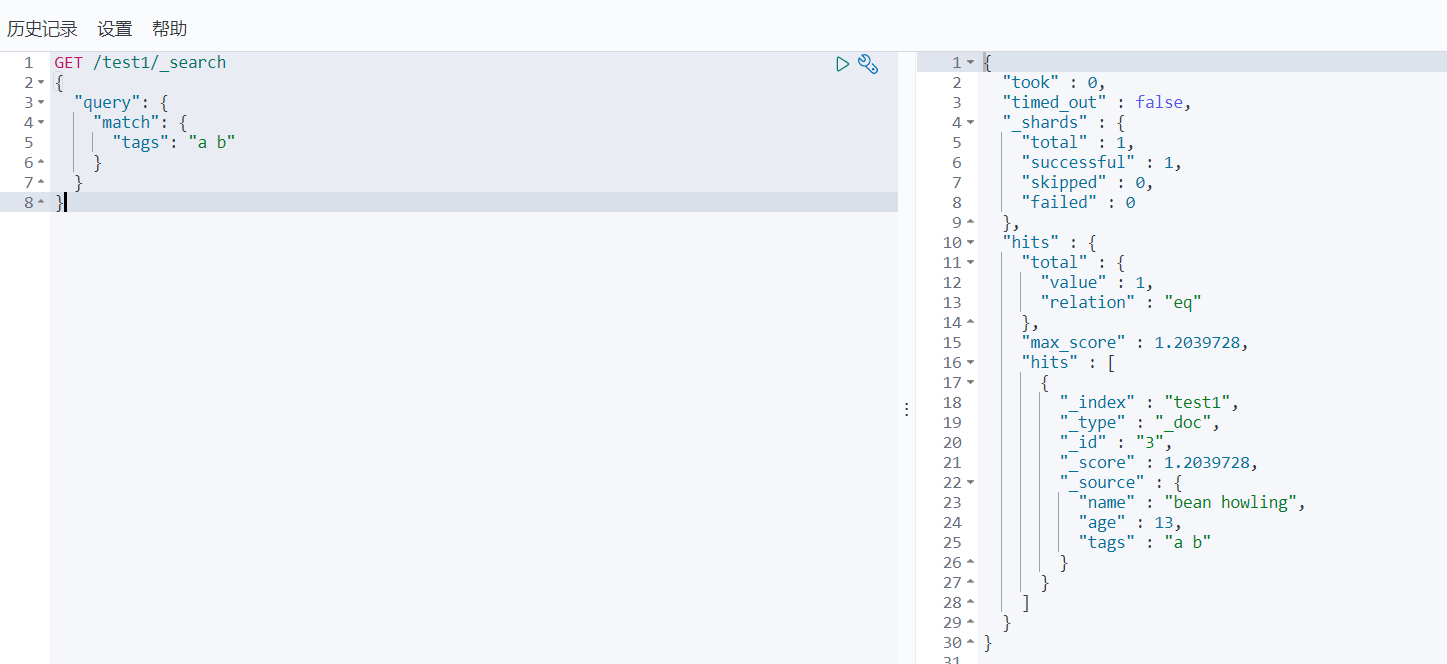
注意match,假如是使用了分词器解析的时候,tags明显可以被分成
a,b,ab等词语但是现在只是查询出了一个,所以说明没有被分词器解析到
# 我非要让term查询多个词语
这个说明就像标题,我非要让term查询多个词语怎么办呢?
没有办法,但是我们可以进行多次查询。
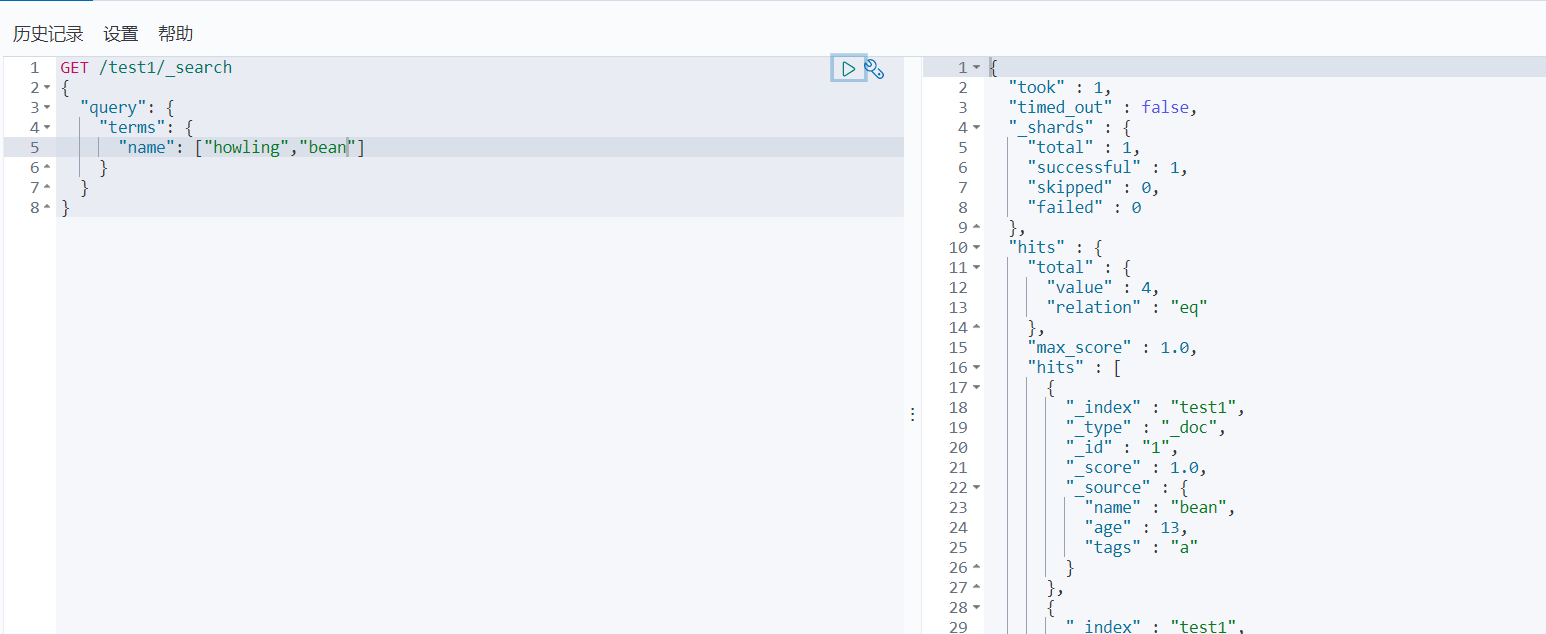
使用terms,我们可以指定多个词语来进行多次倒排索引的查询,结果一起返回
GET /test1/_search
{
  "query": {
    "terms": {
      "name": ["howling","bean"]
    }
  }
}
# 布尔值查询(多条件匹配)
# 前言
bool查询:
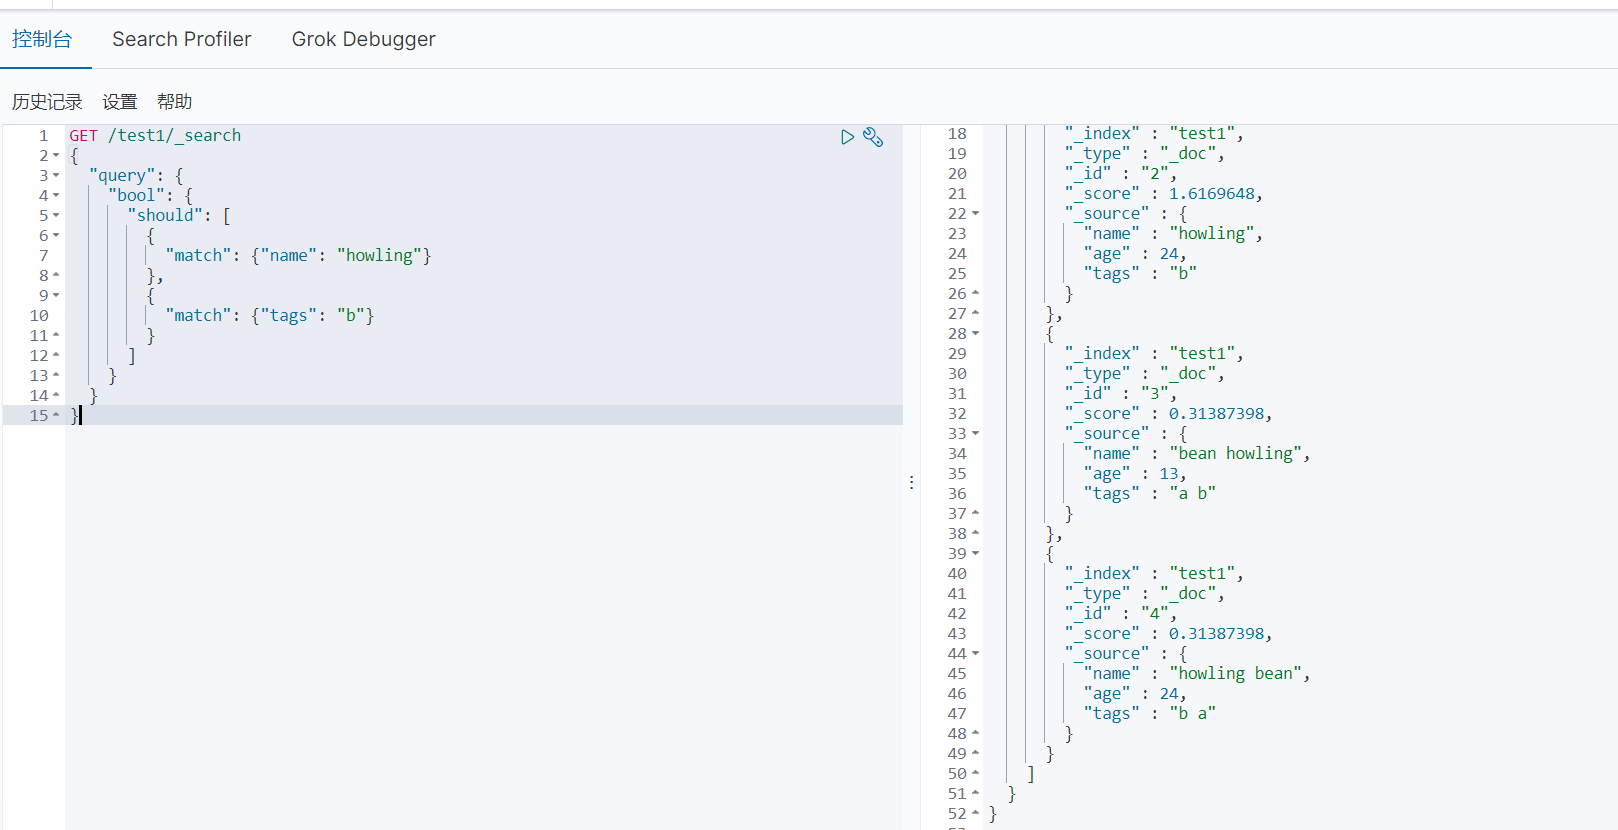
- must:等同于and,所有条件都要符合
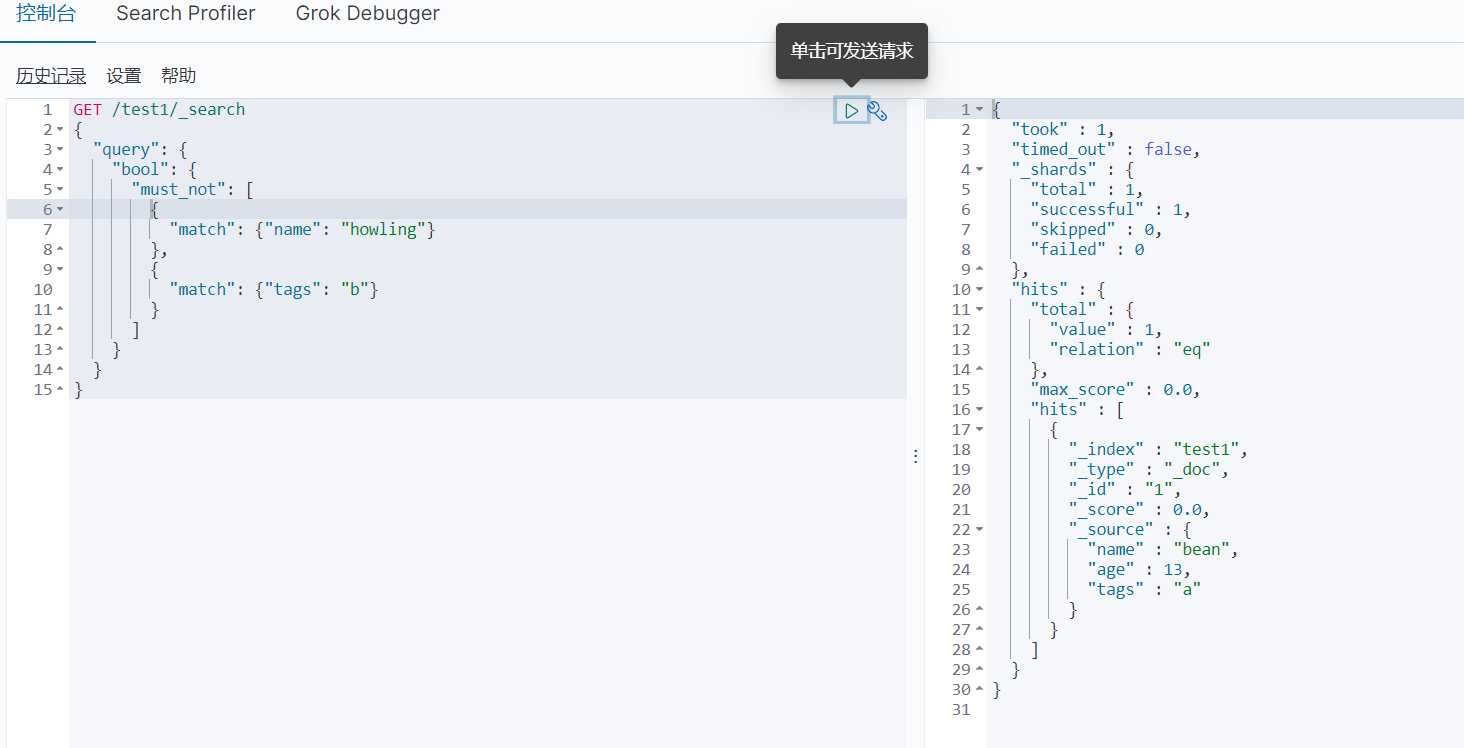
- should:等同于or,只要符合一个条件即可
- must_not:等同于not,取反
- filter:过滤器
- gte:大于等于
- lte:小于等于
- gt:大于
- lt:小于
# must,should,must_not
must
GET /test1/_search
{
  "query": {
    "bool": {
      "must": [
        {
          "match": {"name": "howling"}
        },
        {
          "match": {"tags": "b"}
        }
      ]
    }
  }
}

should
GET /test1/_search
{
  "query": {
    "bool": {
      "should": [
        {
          "match": {"name": "howling"}
        },
        {
          "match": {"tags": "b"}
        }
      ]
    }
  }
}
must_not
GET /test1/_search
{
  "query": {
    "bool": {
      "must_not": [
        {
          "match": {"name": "howling"}
        },
        {
          "match": {"tags": "b"}
        }
      ]
    }
  }
}
# filter,gt,lt,gte,lte
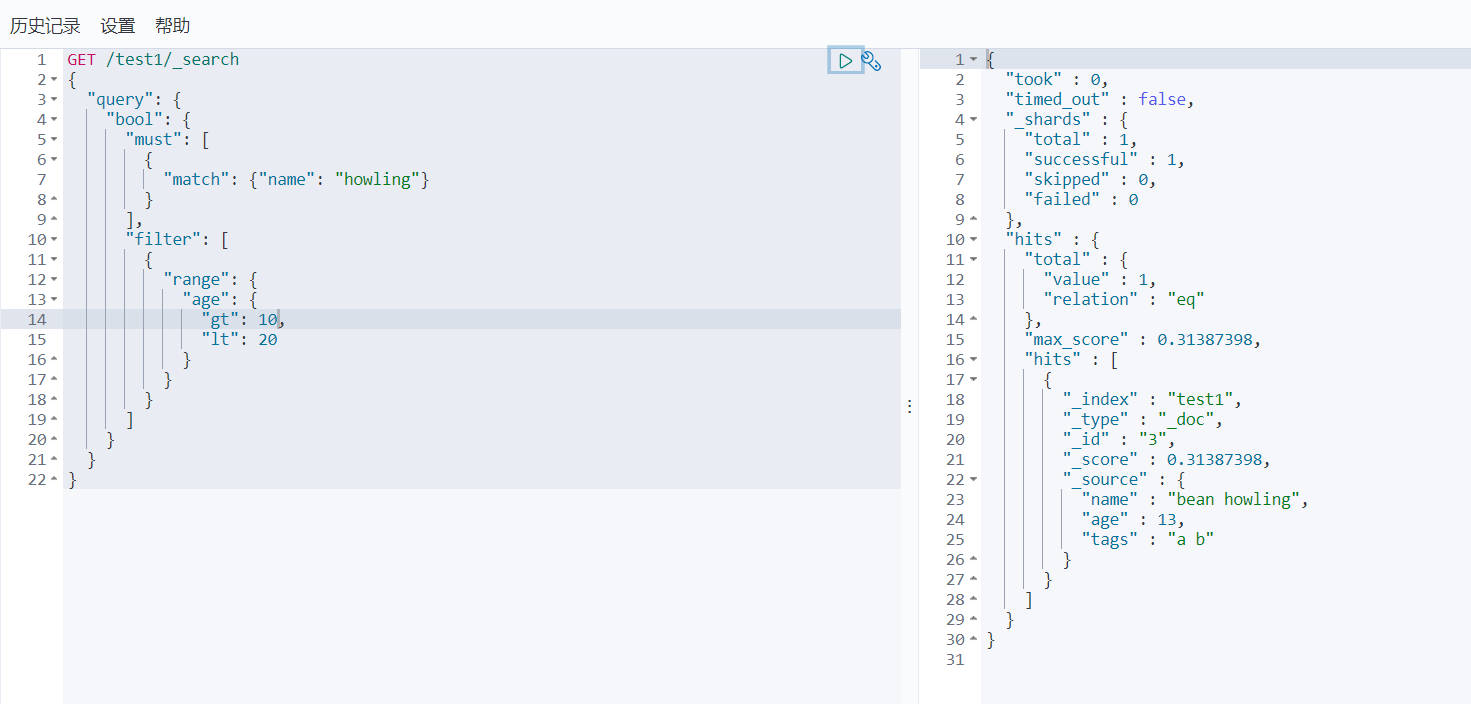
一个例子足够
GET /test1/_search
{
  "query": {
    "bool": {
      "must": [
        {
          "match": {"name": "howling"}
        }
      ],
      "filter": [
        {
          "range": {
            "age": {
              "gt": 10,
              "lt": 20
            }
          }
        }
      ]
    }
  }
}
# 一条件多参数匹配
其实前面已经见过了
GET /test1/_search
{
  "query": {
    "match": {
      "name": "howling bean"
    }
  }
}
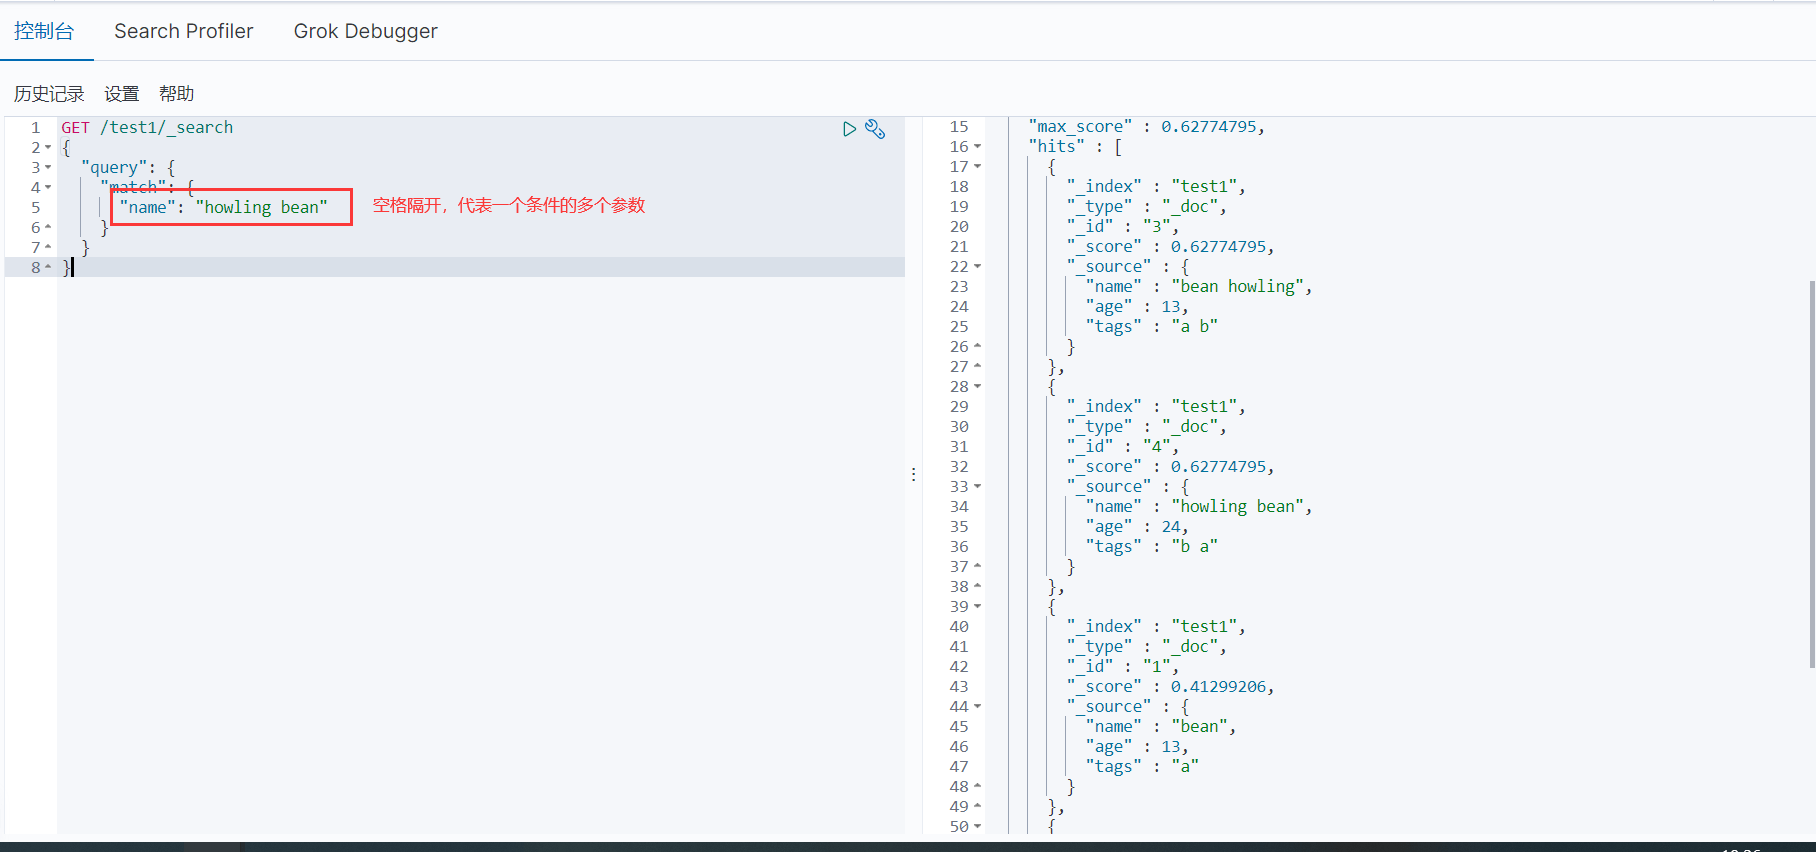
空格隔开,代表一个条件多个参数,这个时候可以使用分词器解析
# 排序
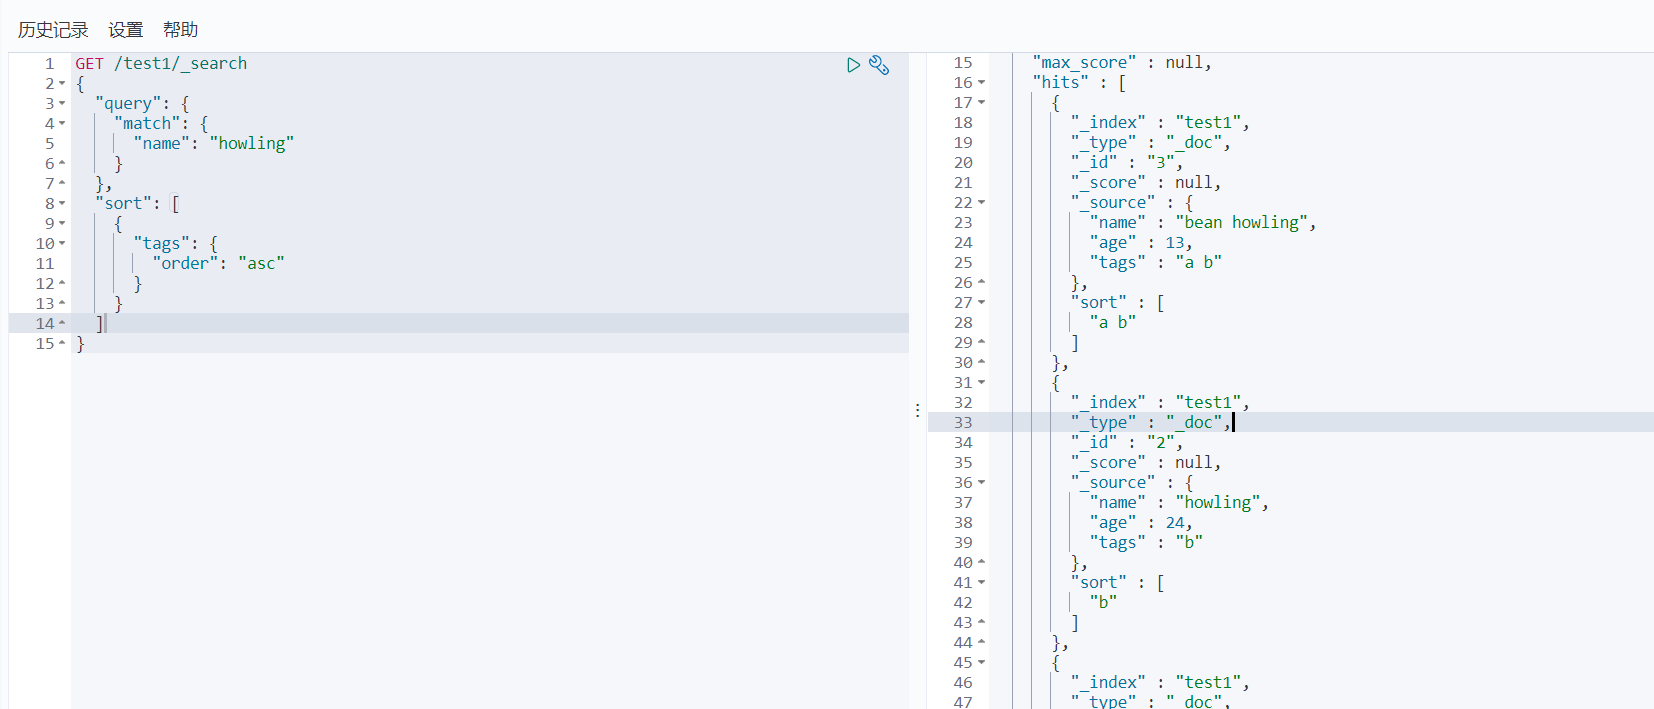
排序警告:原本我们的排序是使用权重排序的,一旦自定义排序之后,权重就失效了
排序:order
GET /test1/_search
{
  "query": {
    "match": {
      "name": "howling"
    }
  },
  "sort": [
    {
      "tags": {
        "order": "asc"
      }
    }
  ]
}
根据tags来排序,ASC和DESC应该不用说了
# 分页
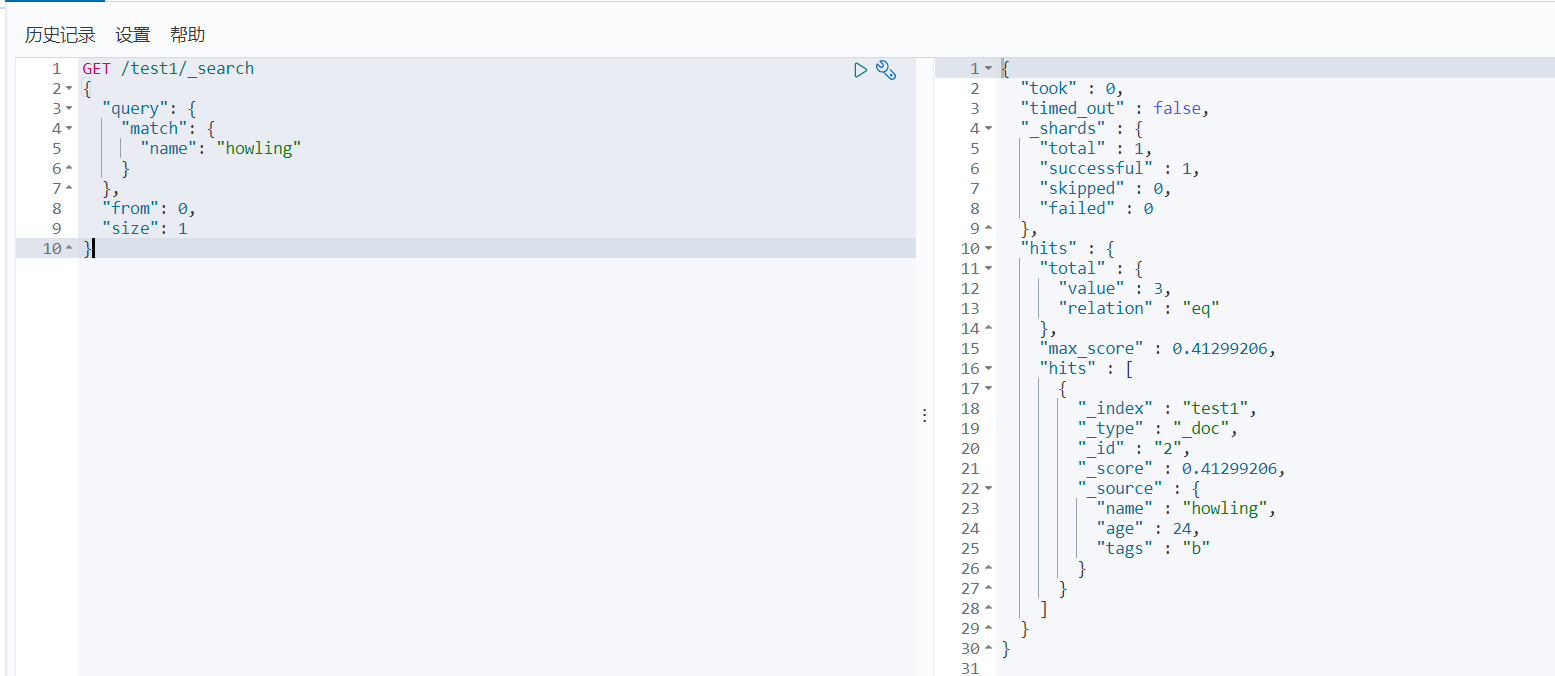
分页:from-size
- from:从第几个数据开始
- size:显示几条数据
GET /test1/_search
{
  "query": {
    "match": {
      "name": "howling"
    }
  },
  "from": 0,
  "size": 1
}
# 高亮
高亮:highlight
GET /test1/_search
{
  "query": {
    "match": {
      "name": "howling bean"
    }
  },
  "highlight": {
    "fields": {
      "name": {}
    }
  }
}
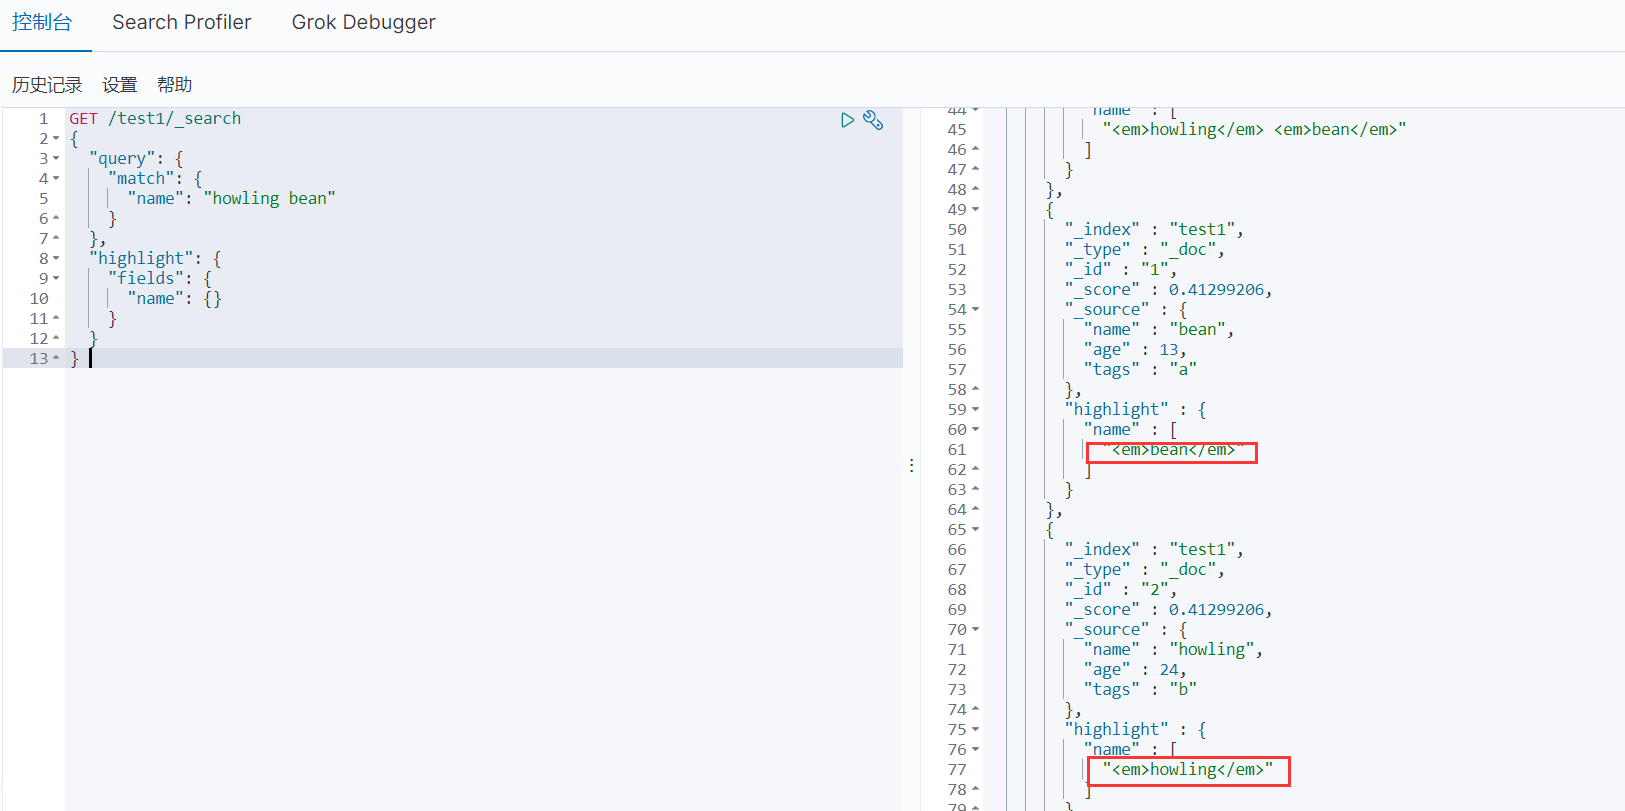
看到标签了么,这就是给前端加上的高亮
自定义高亮
GET /test1/_search
{
  "query": {
    "match": {
      "name": "howling"
    }
  },
  "highlight": {
    "pre_tags": "<p style='color:red'>",
    "post_tags": "</p>",
    "fields": {
      "name": {}
    }
  }
}
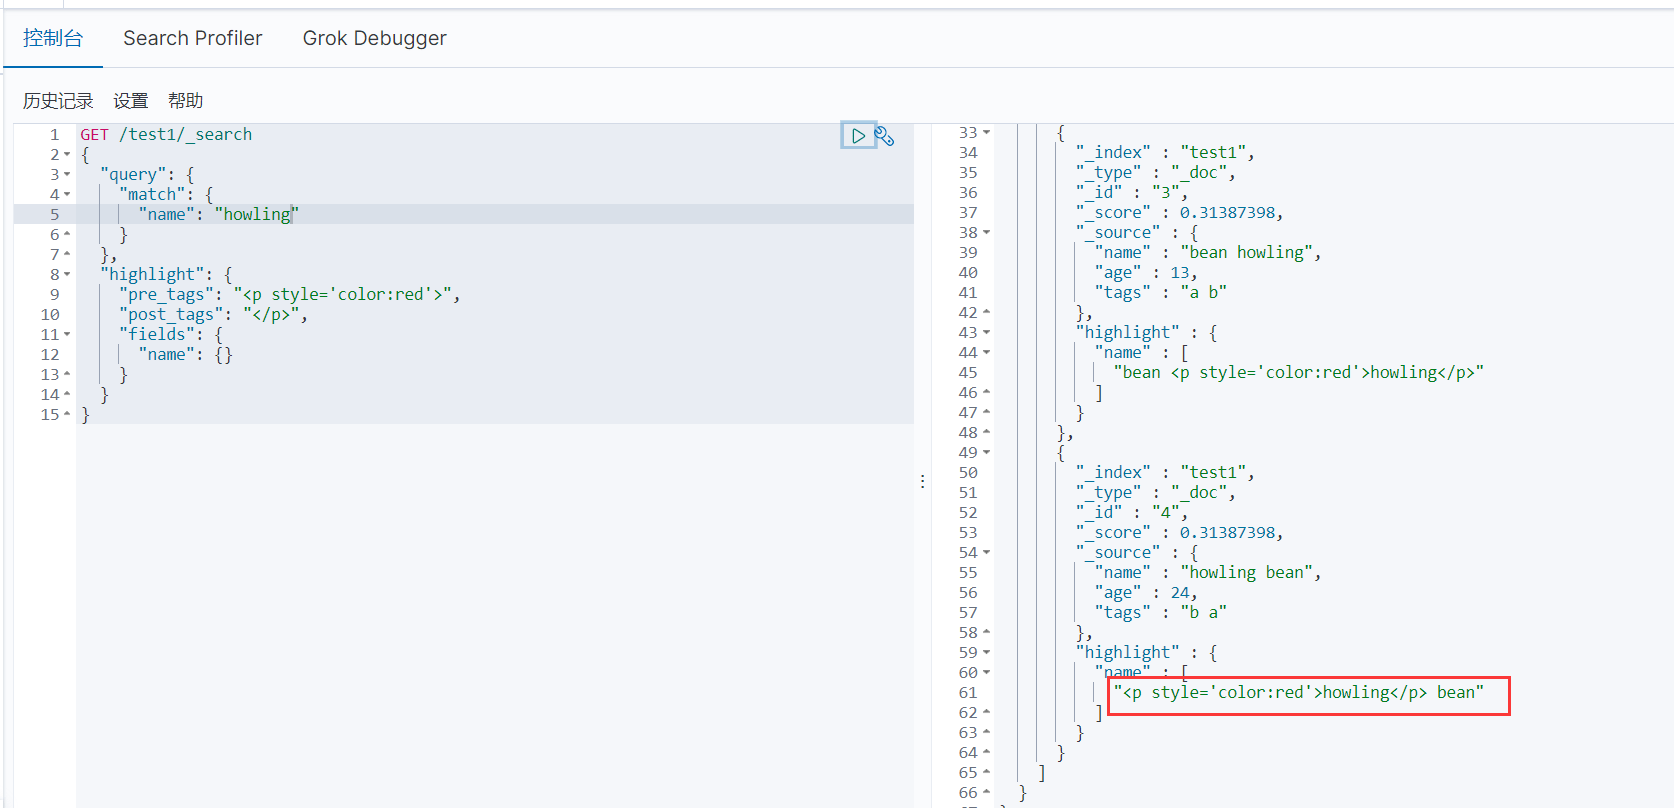
这是自定义高亮
注意我这里有一个细节:查询的时候查询的是howling,那么bean就是没有带上标签
# SpringBoot集成ES
一切从官方文档开始:https://www.elastic.co/guide/index.html (opens new window)
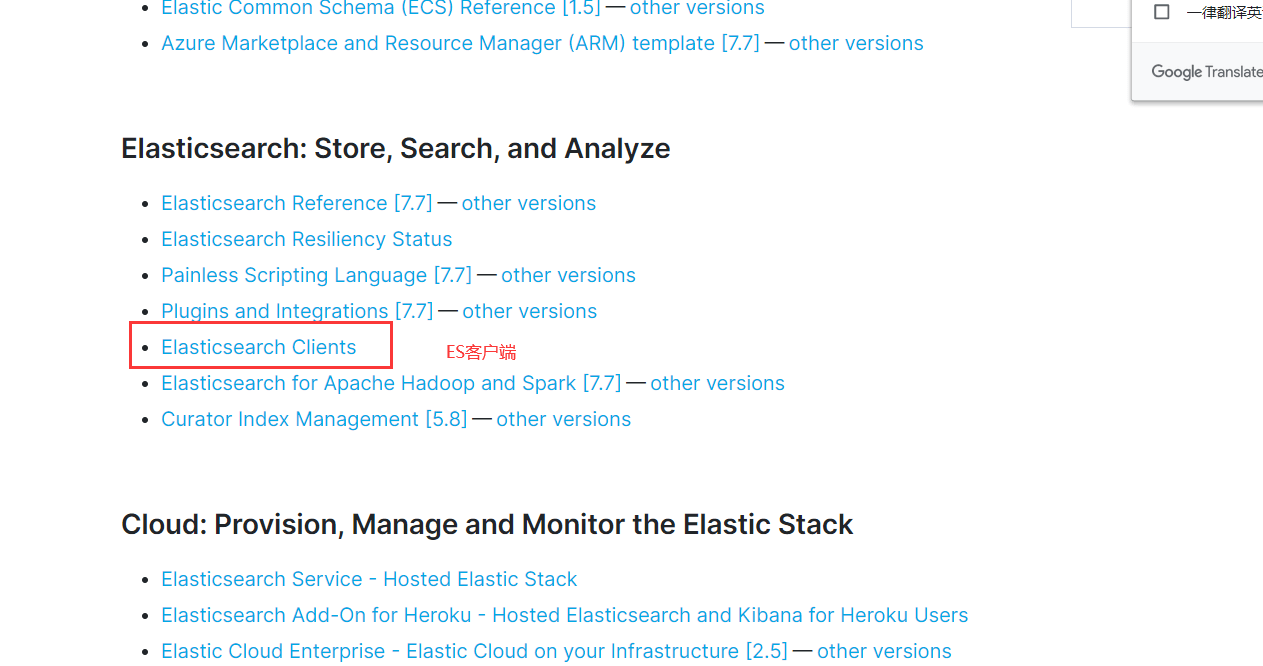
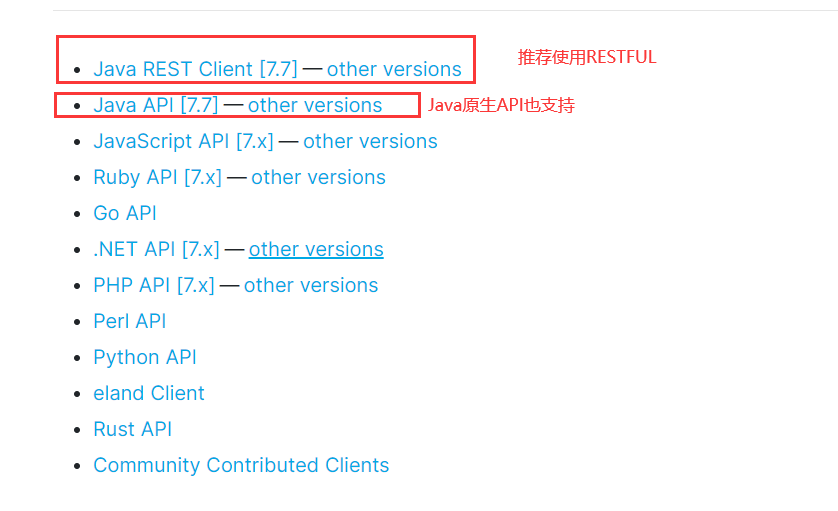
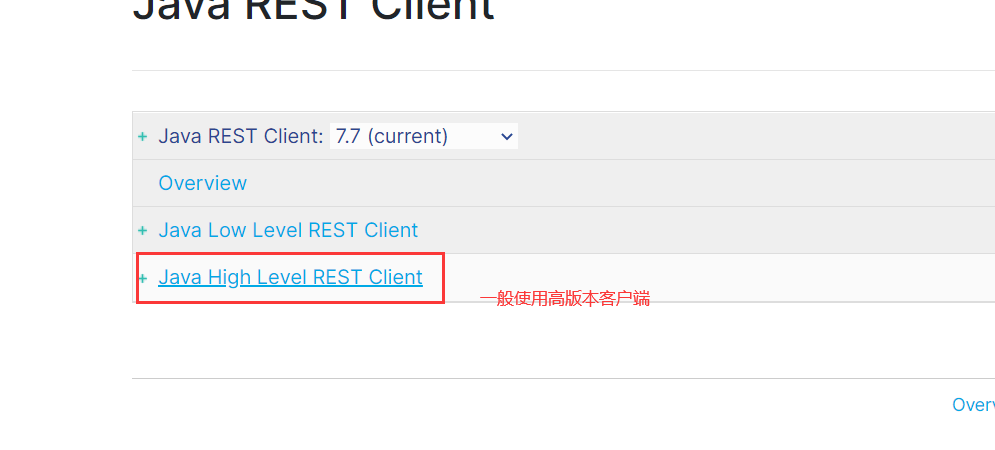
- 找到依赖
<dependency>
    <groupId>org.elasticsearch.client</groupId>
    <artifactId>elasticsearch-rest-high-level-client</artifactId>
    <version>7.6.2</version>
</dependency>
- 找对象


用完别忘了关闭
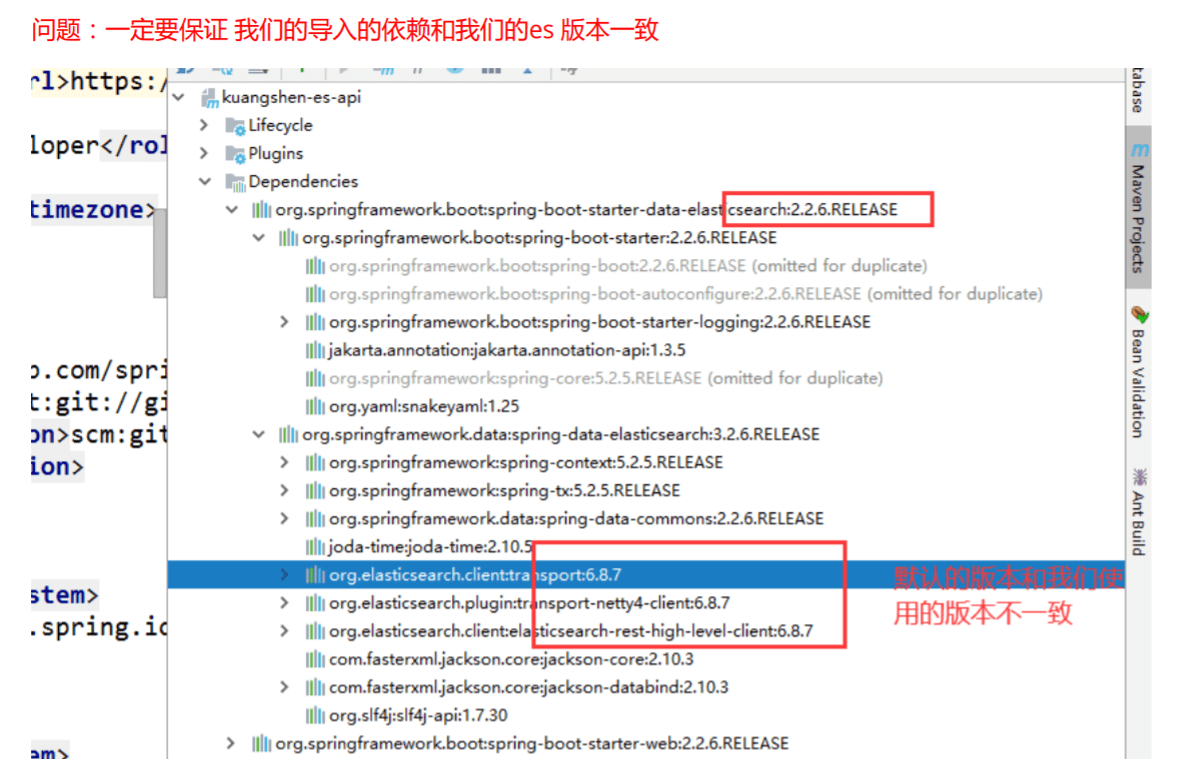
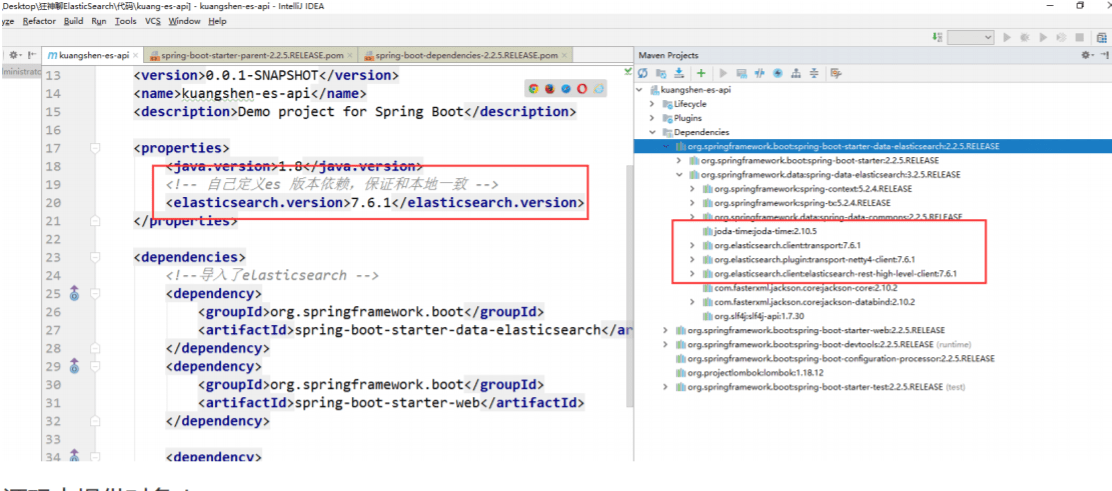
- 保证依赖一致
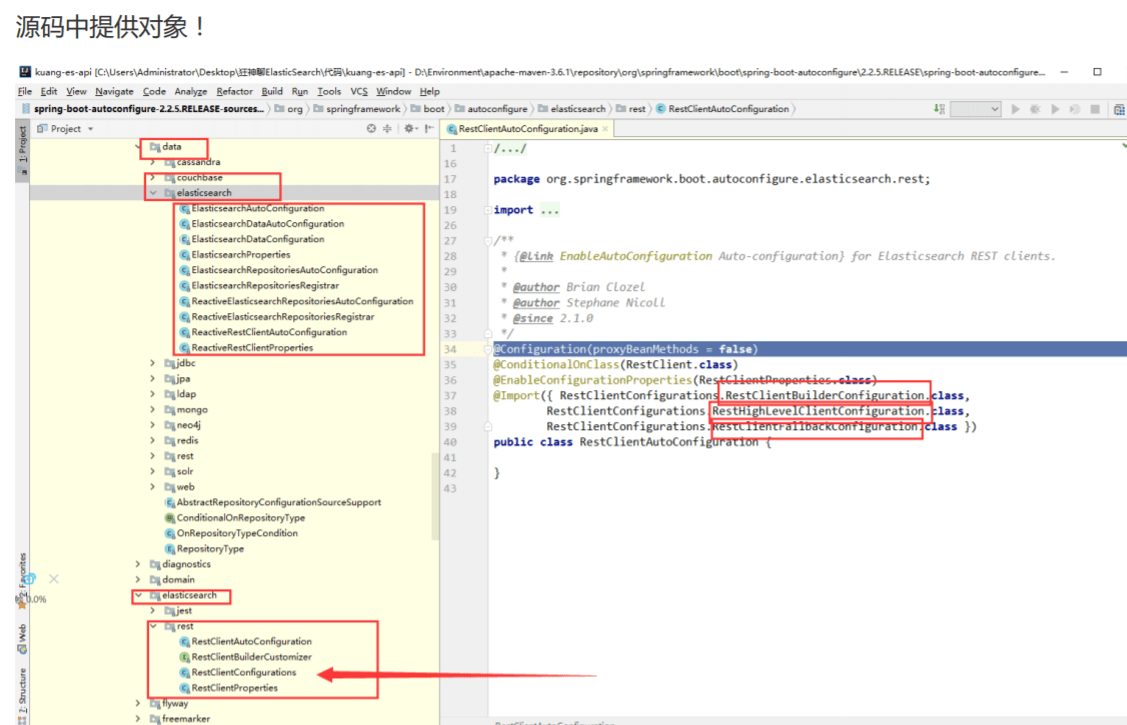
- 源码中提供对象
- 依赖
    <properties>
        <java.version>1.8</java.version>

        <!--手动更改es版本-->
        <elasticsearch.version>7.6.1</elasticsearch.version>
    </properties>
        <!-- https://mvnrepository.com/artifact/com.alibaba/fastjson -->
        <dependency>
            <groupId>com.alibaba</groupId>
            <artifactId>fastjson</artifactId>
            <version>1.2.68</version>
        </dependency>
        <dependency>
            <groupId>org.springframework.boot</groupId>
            <artifactId>spring-boot-starter-data-elasticsearch</artifactId>
        </dependency>
- 配置
package com.bean.config;


import org.apache.http.HttpHost;
import org.elasticsearch.client.RestClient;
import org.elasticsearch.client.RestHighLevelClient;
import org.springframework.context.annotation.Bean;
import org.springframework.context.annotation.Configuration;

@Configuration
public class ElasticSearchClientConfig {

    @Bean
    public RestHighLevelClient restHighLevelClient() {
        RestHighLevelClient client = new RestHighLevelClient(
                RestClient.builder(
                        //localhost,es的端口,连接方式
                        new HttpHost("localhost", 9200, "http")
                )
        );
        return client;
    }

}
- 弄一个简单的对象
package com.bean.pojo;


import lombok.AllArgsConstructor;
import lombok.Data;
import lombok.NoArgsConstructor;
import lombok.experimental.Accessors;
import org.springframework.stereotype.Component;

@AllArgsConstructor
@NoArgsConstructor
@Data
@Accessors(chain = true)
@Component
public class User {

    private String name;
    private int age;
}
- 尝试API
package com.bean;


import com.alibaba.fastjson.JSON;
import com.bean.pojo.User;
import org.apache.lucene.util.QueryBuilder;
import org.elasticsearch.action.admin.indices.delete.DeleteIndexRequest;
import org.elasticsearch.action.bulk.BulkRequest;
import org.elasticsearch.action.bulk.BulkResponse;
import org.elasticsearch.action.delete.DeleteRequest;
import org.elasticsearch.action.delete.DeleteResponse;
import org.elasticsearch.action.get.GetRequest;
import org.elasticsearch.action.get.GetResponse;
import org.elasticsearch.action.index.IndexRequest;
import org.elasticsearch.action.index.IndexResponse;
import org.elasticsearch.action.search.SearchRequest;
import org.elasticsearch.action.search.SearchResponse;
import org.elasticsearch.action.support.master.AcknowledgedResponse;
import org.elasticsearch.action.update.UpdateRequest;
import org.elasticsearch.action.update.UpdateResponse;
import org.elasticsearch.client.IndicesClient;
import org.elasticsearch.client.RequestOptions;
import org.elasticsearch.client.RestHighLevelClient;
import org.elasticsearch.client.indices.CreateIndexRequest;
import org.elasticsearch.client.indices.CreateIndexResponse;
import org.elasticsearch.client.indices.GetIndexRequest;
import org.elasticsearch.common.unit.TimeValue;
import org.elasticsearch.common.xcontent.XContentType;
import org.elasticsearch.index.get.GetResult;
import org.elasticsearch.index.query.MatchAllQueryBuilder;
import org.elasticsearch.index.query.QueryBuilders;
import org.elasticsearch.index.query.TermQueryBuilder;
import org.elasticsearch.search.SearchHit;
import org.elasticsearch.search.builder.SearchSourceBuilder;
import org.junit.jupiter.api.Test;
import org.springframework.beans.factory.annotation.Autowired;
import org.springframework.beans.factory.annotation.Qualifier;
import org.springframework.boot.test.context.SpringBootTest;

import java.io.IOException;
import java.util.ArrayList;
import java.util.List;
import java.util.concurrent.TimeUnit;

@SpringBootTest
class EsApplicationTests {

    @Autowired
    @Qualifier("restHighLevelClient")
    private RestHighLevelClient client;

    //创建索引
    @Test
    void createIndex() throws IOException {
        //创建一个请求,请求包含创建的索引
        CreateIndexRequest request = new CreateIndexRequest("bean_test");

        //这个indicesClinet包含了所有东西
        IndicesClient indices = client.indices();

        //创建索引,把请求给他,请求设置就使用默认的就好
        CreateIndexResponse createIndexResponse = indices.create(request, RequestOptions.DEFAULT);

        //打印一下看看什么东西:org.elasticsearch.client.indices.CreateIndexResponse@8a7f4660
        System.out.println(createIndexResponse);
    }

    //查看索引是否存在
    @Test
    void isExistIndex() throws IOException {
        //创建一个请求,请求包含创建的索引

        GetIndexRequest request = new GetIndexRequest("bean_test");

        IndicesClient indices = client.indices();

        boolean exists = indices.exists(request, RequestOptions.DEFAULT);

        System.out.println(exists);
    }

    //删除索引
    @Test
    void deleteIndex() throws IOException {
        DeleteIndexRequest request = new DeleteIndexRequest("bean_test");

        AcknowledgedResponse delete = client.indices().delete(request, RequestOptions.DEFAULT);

        //查看是否删除成功
        System.out.println(delete.isAcknowledged());
    }

    //插入文档
    @Test
    void indexDocument() throws IOException {
        User user = new User("bean", 10);

        //规则: put/bean_test/1
        IndexRequest request = new IndexRequest("bean_test");
        request.id("1");
        //设置超时时间为1s
        request.timeout(TimeValue.timeValueSeconds(1));

        //将数据放入json
        request.source(JSON.toJSONString(user), XContentType.JSON);

        //发送数据,获得相应
        IndexResponse response = client.index(request, RequestOptions.DEFAULT);

        System.out.println(request.toString());//返回索引信息:index {[bean_test][_doc][1], source[{"age":10,"name":"bean"}]}

        System.out.println(response.status());//返回当前的状态:CREATED

    }


    //文档是否存在
    @Test
    void existDocument() throws IOException {
        GetRequest request = new GetRequest("bean_test", "1");

        boolean exists = client.exists(request, RequestOptions.DEFAULT);

        System.out.println(exists);
    }

    //获得文档的具体信息
    @Test
    void getDocument() throws IOException {
        GetRequest request = new GetRequest("bean_test", "1");

        GetResponse getResponse = client.get(request, RequestOptions.DEFAULT);

        //打印文档内容:{"age":10,"name":"bean"}
        System.out.println(getResponse.getSourceAsString());

        //返回的全部的内容:{"_index":"bean_test","_type":"_doc","_id":"1","_version":2,"_seq_no":1,"_primary_term":1,"found":true,"_source":{"age":10,"name":"bean"}}
        System.out.println(getResponse);
    }

    //更新文档
    @Test
    void updateDocument() throws IOException {
        UpdateRequest request = new UpdateRequest("bean_test", "1");

        User user = new User("豌豆", 22);

        UpdateRequest doc = request.doc(JSON.toJSONString(user), XContentType.JSON);

        UpdateResponse updateResponse = client.update(request, RequestOptions.DEFAULT);

        //OK
        System.out.println(updateResponse.status());

    }

    //删除文档
    @Test
    void deleteDocument() throws IOException {

        DeleteRequest request = new DeleteRequest("bean_test", "1");

        DeleteResponse deleteResponse = client.delete(request, RequestOptions.DEFAULT);

        //OK
        System.out.println(deleteResponse.status());

    }

    //批量请求
    @Test
    void testBulkRequest() throws IOException {
        BulkRequest bulkRequest = new BulkRequest();

        List<User> list = new ArrayList<>();
        list.add(new User("bean1", 3));
        list.add(new User("bean2", 3));
        list.add(new User("bean3", 3));
        list.add(new User("bean4", 3));
        list.add(new User("bean5", 3));
        list.add(new User("bean6", 3));

        for (int i = 0; i < list.size(); i++) {
            bulkRequest.add(
                    new IndexRequest("bean_test")
                            .id("" + (i + 1))
                            .source(JSON.toJSONString(list.get(i)), XContentType.JSON)
            );
        }

        BulkResponse bulk = client.bulk(bulkRequest, RequestOptions.DEFAULT);
        System.out.println(bulk.hasFailures());//false,但是false代表的是成功
    }


    //查询
    @Test
    void search() throws IOException {
        SearchRequest request = new SearchRequest("bean_test");

        //利用这个搜索构建器可以构建出所有的查询条件,我们的原生所有的搜索条件都在这里
        SearchSourceBuilder builder = new SearchSourceBuilder();


        //比如我要使用高亮:builder.highlighter()
        //比如说我要分页:builder.from(),builder.size()
        //排序:builder.sort()

        //虽然所有的条件都在这里,但是有些需要一些构造器,比如query就需要一个query的builder
        //下面使用query作为一个例子:可以使用queryBuilders这个工具类进行快速匹配


//        MatchAllQueryBuilder queryBuilder = QueryBuilders.matchAllQuery();
        TermQueryBuilder queryBuilder = QueryBuilders.termQuery("name", "bean1");
        //查询
        builder.query(queryBuilder);

        //设置超时时间
        builder.timeout(new TimeValue(60, TimeUnit.SECONDS));

        //将搜索构建起放到请求里面
        request.source(builder);
        //执行
        SearchResponse search = client.search(request, RequestOptions.DEFAULT);

        //在之前我们就说过,hits里面都是具体的信息
        /*
            {
                "fragment":true,
                "hits":
                    [
                        {
                            "fields":{},
                            "fragment":false,
                            "highlightFields":{},
                            "id":"1",
                            "matchedQueries":[],
                            "primaryTerm":0,
                            "rawSortValues":[],
                            "score":1.540445,
                            "seqNo":-2,
                            "sortValues":[],
                            "sourceAsMap":{"name":"bean1","age":3},
                            "sourceAsString":"{\"age\":3,\"name\":\"bean1\"}",
                            "sourceRef":{"fragment":true},
                            "type":"_doc",
                            "version":-1
                        }
                    ],
                "maxScore":1.540445,
                "totalHits":{"relation":"EQUAL_TO","value":1}
            }
         */
        System.out.println(JSON.toJSONString(search.getHits()));

        System.out.println("==========================");

        ////{name=bean1, age=3}
        for (SearchHit hit : search.getHits().getHits()) {
            System.out.println(hit.getSourceAsMap());
        }
    }
}
# 爬虫练习
找京东的页面
- 依赖
        <dependency>
            <groupId>org.springframework.boot</groupId>
            <artifactId>spring-boot-starter-data-elasticsearch</artifactId>
        </dependency>


        <!-- https://mvnrepository.com/artifact/org.jsoup/jsoup -->
        <dependency>
            <groupId>org.jsoup</groupId>
            <artifactId>jsoup</artifactId>
            <version>1.11.3</version>
        </dependency>
- pojo,对应名字,价格,图片
package com.bean.pojo;


import lombok.AllArgsConstructor;
import lombok.Data;
import lombok.NoArgsConstructor;
import lombok.experimental.Accessors;

@Data
@AllArgsConstructor
@NoArgsConstructor
@Accessors(chain = true)
public class Content {

    private String name;
    private String price;
    private String img;
}
- Util
package com.bean.utils;

import com.bean.pojo.Content;
import org.jsoup.Jsoup;
import org.jsoup.nodes.Document;
import org.jsoup.nodes.Element;
import org.jsoup.select.Elements;

import java.io.IOException;
import java.net.URL;
import java.util.ArrayList;
import java.util.List;

public class JsoupUtil {

    public static List<Content> getMessage(String keyword) throws IOException {

        String url = "https://search.jd.com/Search?keyword="+keyword+"&enc=utf-8";

        List<Content> contents = new ArrayList<>();


        //返回的json
        Document document = Jsoup.parse(new URL(url), 3000);

        //获取所有的产品列表
        Element elements = document.getElementById("J_goodsList");
        //获取所有的li
        Elements li = elements.getElementsByTag("li");

        for (Element element : li) {
            //获取对应的图片
            String img = element.getElementsByTag("img").get(0).attr("src");
            //获取对应的价格
            String price = element.getElementsByClass("p-price").get(0).text();
            //获取对应的名称
            String name = element.getElementsByClass("p-name").get(0).getElementsByTag("em").text();

            contents.add(new Content(name,price,img));
        }
        return contents;
    }
}
- 测试
package com.bean;

import com.bean.pojo.Content;
import com.bean.utils.JsoupUtil;
import org.jsoup.Jsoup;
import org.jsoup.nodes.Document;
import org.jsoup.nodes.Element;
import org.jsoup.select.Elements;
import org.junit.jupiter.api.Test;
import org.springframework.boot.test.context.SpringBootTest;

import java.io.IOException;
import java.net.MalformedURLException;
import java.net.URL;
import java.util.List;

@SpringBootTest
class EsjdApplicationTests {

    @Test
    void contextLoads() throws IOException {

        List<Content> message = JsoupUtil.getMessage("你好");

        message.forEach(System.out::println);
    }

}


